Monday, July 31, 2017
How To View 18 Videos In YouTube Without Sign In
How To View 18 Videos In YouTube Without Sign In
Hello readers, today i am going to share a good trick by which you can view 18+ videos in YouTube without sign in. I know people dont like all the time sign in to every website so here our trick start its work. Lets See


Steps To Follow :
- Get Video URL you want to watch without sign in.
Example : http://www.youtube.com/watch?v=4Xkh6j7RMqk - Cut The Video ID of URL i.e. 4Xkh6j7RMqk
- Remove " watch? " from the URL.
Example: http://www.youtube.com/v/ - Now paste videoID in the end of URL like this
Example : http://www.youtube.com/v/4Xkh6j7RMqk?fs=1 - Now Enjoy Your Video Without Sign In.
Dont Forget To Like And Follow..
Available link for download
HOW TO ROLLBACK FROM WINDOWS 10 TECHNICAL PREVIEW TO WINDOWS 8 1 FOR PHONES
HOW TO ROLLBACK FROM WINDOWS 10 TECHNICAL PREVIEW TO WINDOWS 8 1 FOR PHONES
Windows 10 preview
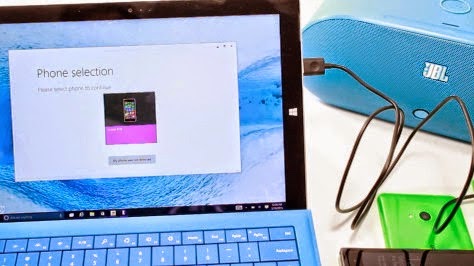
It has been a day since Windows 10 Preview for phone was released for many devices after a wait and youve probably realized that it is far from being finished. While you had fun checking out the Preview, you want to go back to a more stable build. If you want to roll back to Windows Phone 8.1, Microsoft has made it really simple. Youll need a computer, your phone, a USB cable, and the Windows Phone Recovery Tool. make sure that your computer and phone are charged. Are you ready? Continue reading for the next steps.Rollback
1.Download and install the Windows Phone Recovery Tool to your computer.2.Open the Windows Phone Recovery Tool and connect the phone to your computer with the USB cable. If your phone is not automatically detected, disconnect it from your computer and press My phone was not detected at the bottom and follow the instructions on the screen.
3.If the phone is detected, tap the phone model on the screen to continue.
4.The next screen shows software versions. Tap the reinstall button at the bottom
5.Theres a disclaimer that suggests to backup your phone. Tap continue at the bottom.
6.The recovery tool downloads and installs the firmware. This may take a while depending on your network connection. The installation files are about 1.7 GB. Make sure not to disconnect the cable.
7.If all goes well, you get a message that says, "Operation successfully completed."
Thats it! You should now be back on Windows Phone 8.1. Well let you know if a new build for Windows 10 Preview for phone shows up.
Source - www.Facebook.com//520NL
For more details stay tuned -- http://facebook.com/lumians.world
Thanks for visiting us :-)
Available link for download
Jack Ryan Shadow Recruit 2014 BluRay 720p 750MB
Jack Ryan Shadow Recruit 2014 BluRay 720p 750MB
 |
| Jack Ryan Shadow Recruit (2014) |
Download Film Jack Ryan: Shadow Recruit
Genre: Action, Mystery, Thriller
Year: 2014
Rating: 6.5 (17,090 votes)
Runtime: 105 min
Director: Kenneth Branagh
Cast: Chris Pine, Keira Knightley, Kevin Costner, Kenneth Branagh
Imovdb Url: http://imovdb.com/movie/tt1205537
Jack Ryan, as a young covert CIA analyst, uncovers a Russian plot to crash the U.S. economy with a terrorist attack.
Link Download
=====================
Download | ightyupload
Download | uptobox
Download | megafiles
Download | 180upload
Download | project-free-upload
=====================
Download | Subtitle Indonesia
Available link for download
Sunday, July 30, 2017
HTC T328D VIRUS REMOVED EASILY WITH NEW VER 1 31 OF Gsm Aladdin Key V2
HTC T328D VIRUS REMOVED EASILY WITH NEW VER 1 31 OF Gsm Aladdin Key V2
HTC T328D VIRUS REMOVED EASILY WITH NEW VER 1.31 OF Gsm Aladdin Key V2 More Magice Once Again   | |
 |  |
Available link for download
How To Share Terminal Session With Friends
How To Share Terminal Session With Friends
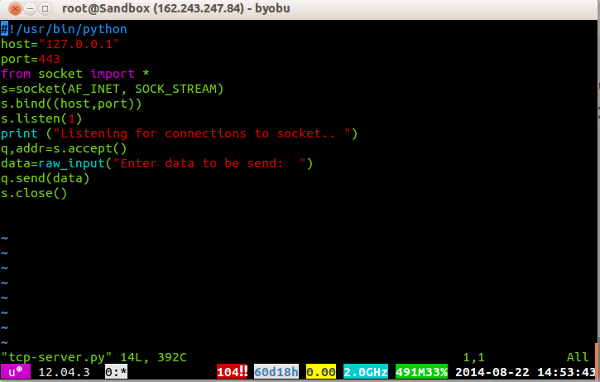
If you are a command-line junkie, you have most likely spent hours troubleshooting broken scripts or writing your own. This process can be exhausting for one person, and you have probably wished for a simple way to share your terminal session with friends so they could assist you. Linux/Unix make it extremely easy with a simple terminal program called Byobu. Byobu is an extension of terminal multiplexers’ GNU Screen or TMUX for short, and allows you to share a terminal session with as many people as you want.
Installation
Installing Byobu on most Linux distributions is incredibly easy. Open your terminal and execute the appropriate command for your distribution.
Debian/Ubuntu/Linux Mint (and other Debian-based or Ubuntu-based distros):
sudo apt-get install byobu
CentOS/Red Hat Linux/Fedora:
sudo yum install byobu
ArchLinux:
sudo pacman -Sy byobu
Gentoo:
sudo emerge byobu
Mac OS X
Installation on Mac OS X is almost as simple. The only requirement is that you have Homebrew installed. Homebrew is an unofficial package-manager for Mac OS X. It makes installing command-line utilities extremely easy.
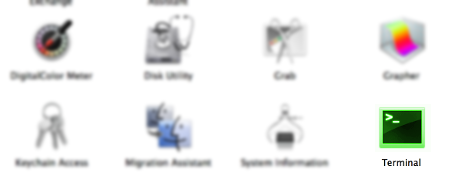
To install Homebrew, open your terminal by navigating to “Finder -> Utilities” and locating the terminal icon.
Paste the following command to begin the installation, and type your password when prompted.
ruby -e "$(curl -fsSL https://raw.github.com/Homebrew/homebrew/go/install)"
Once installation is complete, you are ready to install Byobu.
sudo brew install byobu
Get Sharing
Byobu’s default configuration options will let you share your screen directly after install. Once you have installed byobu, you can create a session instantly by typing byobu.
byobu
Now open up a second terminal and do the same thing. You will instantly be dropped into the same byobu session as the first.
Obviously, connecting locally to a Byobu session on the same computer is fairly useless, but Byobu works remotely as well over SSH.
If you are running a remote server, first connect to it over SSH like normal.
ssh user@somehost
Once again, type byobu.
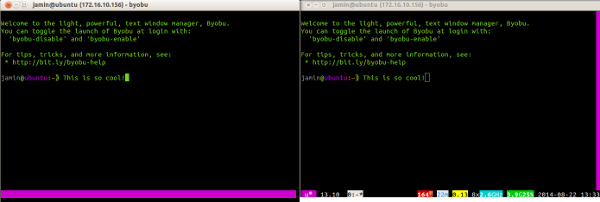
Repeat this process with as many people as you want. Instantly, they will attach to your Byobu session. Each of them will be able to view and control the session.
Byobu Remote Connect To Server From 1st Client -
Byobu remote connect to server from 2nd Client -
Some Extra Features -
Byobu has many additional features that can be accessed via keyboard shortcuts.- Create a new terminal session inside Byobu- f2
- Switch between terminal sessions inside Byobu- f4
- Detach from Byobu session and logout- f6
- Split the Byobu screen vertically- control + f2
- Split the Byobu screen horizontally- shift + f2
- Launch the Byobu configuration menu- f9

From the configuration menu, you can change the display notifications at the bottom of the terminal as well as launch Byobu from the startup. More advanced users can also set an alternate escape sequence which by default is “Ctrl + A”.
For more cool tips and tricks such as custom background colors, check out Ubuntu’s Byobu documentation.
Dont Forget To Like And Follow..
Available link for download
How to Get the Old Thin Taskbar Buttons with Text in Windows 7
How to Get the Old Thin Taskbar Buttons with Text in Windows 7
Here are the steps
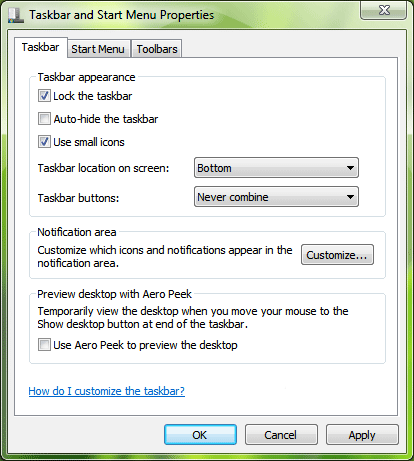
1. Right-click on Taskbar and select Properties.
2. Now enable "Use small icons" option.
3. Youll also see that "Taskbar buttons" option would be set to "Always combine, hide labels". Change it to either "Combine when taskbar is full" or "Never combine".
"Combine when taskbar is full" option will group same program buttons in taskbar like Windows XP and Vista. "Never combine" option will disable grouping.
4. Thats it. Apply the changes and you can enjoy the same old thin taskbar with program text in Windows 7.
-----------------------------------------------------------------------------------------------------------------
From online computer repair to setup and installation to security and optimization – get everything at one place. Welcome to Techvedic. We are here to make technology work for you the way you want. Get in touch with our experienced professionals over the phone: 0800 016 3909 (Toll Free). Remember, we are not constrained by the brand make or model or even the warranty status. Cheers!
About Techvedic: http://en.wikipedia.org/wiki/Techvedic
Get in touch with Techvedic on Social Media:
Techvedic Facebook Page: https://www.facebook.com/techvedic
Techvedic Twitter : https://twitter.com/techvedic
Techvedic Google Plus Page: https://plus.google.com/+TechvedicInc/posts
Techvedic Youtube:https://www.youtube.com/user/Techvedic
Techvedic Linkidin Profile: https://www.linkedin.com/company/techvedic
Visit: Techvedic - Computer Tech Support Company | http://www.techvedic.co.uk/ | 0800 016 3909 (UK) | support@techvedic.com
Available link for download
Free Download Octoplus Octopus Box LG v 2 0 2 Double Impact!
Free Download Octoplus Octopus Box LG v 2 0 2 Double Impact!

Street magic! 2.0.2 brings you a long awaited worlds first and exclusive full support of LG Duos phones!
Octopus - the box that will bl?w your mind!
Octoplus/Octopus Box LG v.2.0.2 is out!
Added worlds first support for L90, G2 Mini, G3 Beat, G3s, G3 Dual SIM phones!
Octoplus/Octopus Box LG Software v.2.0.2 Release Notes:
- Added support for the following models:
- D856 - added worlds first
Direct Unlock, Repair IMEI (A/B), Write Firmware, Repair BT Address,
Repair Wi-Fi Address, Read/Write NVM, Read/Write QCN, Read Security,
Write Security Backup, Read Full Flash (Dump NAND), Reset Screen Lock
- D857 - added worlds first
Direct Unlock, Repair IMEI (A/B), Write Firmware, Repair BT Address,
Repair Wi-Fi Address, Read/Write NVM, Read/Write QCN, Read Security,
Write Security Backup, Read Full Flash (Dump NAND), Reset Screen Lock
- D858 - added worlds first
Direct Unlock, Repair IMEI (A/B), Write Firmware, Repair BT Address,
Repair Wi-Fi Address, Read/Write/Repair NVM, Read/Write QCN, Read/Repair
Security, Write Security Backup, Read Full Flash (Dump NAND), Reset
Screen Lock
- D858HK - added worlds first
Direct Unlock, Repair IMEI (A/B), Write Firmware, Repair BT Address,
Repair Wi-Fi Address, Read/Write/Repair NVM, Read/Write QCN, Read/Repair
Security, Write Security Backup, Read Full Flash (Dump NAND), Reset
Screen Lock
- D859 - added worlds first
Direct Unlock, Repair IMEI (A/B), Write Firmware, Repair BT Address,
Repair Wi-Fi Address, Read/Write NVM, Read/Write QCN, Read Security,
Write Security Backup, Read Full Flash (Dump NAND), Reset Screen Lock
- D722AR - added worlds first
Direct Unlock, Repair IMEI, Write Firmware, Repair BT Address, Repair
Wi-Fi Address, Repair Network, Read/Write/Repair NVM, Read/Write QCN,
Read/Repair Security, Write Security Backup, Read Full Flash (Dump
NAND), Reset Screen Lock.
- D722PA - added worlds first
Direct Unlock, Repair IMEI, Write Firmware, Repair BT Address, Repair
Wi-Fi Address, Repair Network, Read/Write/Repair NVM, Read/Write QCN,
Read/Repair Security, Write Security Backup, Read Full Flash (Dump
NAND), Reset Screen Lock.
- D727 - added worlds first
Direct Unlock, Repair IMEI, Write Firmware, Repair BT Address, Repair
Wi-Fi Address, Read/Write NVM, Read/Write QCN, Read Security, Write
Security Backup, Read Full Flash (Dump NAND), Reset Screen Lock
- D728 - added worlds first
Direct Unlock, Repair IMEI (A/B), Write Firmware, Repair BT Address,
Repair Wi-Fi Address, Read/Write NVM, Read/Write QCN, Read Security,
Write Security Backup, Read Full Flash (Dump NAND), Reset Screen Lock
- D729 - added worlds first
Direct Unlock, Repair IMEI (A/B), Write Firmware, Repair BT Address,
Repair Wi-Fi Address, Read/Write NVM, Read/Write QCN, Read Security,
Write Security Backup, Read Full Flash (Dump NAND), Reset Screen Lock
- D724 - added worlds first Direct Unlock, Repair IMEI (A/B)
- D410 - added worlds first Direct Unlock, Repair IMEI (A/B)
- D410H - added worlds first Direct Unlock, Repair IMEI (A/B)
- D410N - added worlds first Direct Unlock, Repair IMEI (A/B)
- D618 - added worlds first Direct Unlock, Repair IMEI (A/B), Factory Reset
- New QCN files were uploaded into the Support Area!
- All supported operations are described in details in the manual ("Cable & Manual" button in Software)
Download Octoplus/Octopus Box LG v.2.0.2
Available link for download
How to Use Volcano Tool JIG Cable As USB Cable To Flash MTK 625A 62xx Phones
How to Use Volcano Tool JIG Cable As USB Cable To Flash MTK 625A 62xx Phones
Here is the tutorial to use volcano tool JIG cable as a USB cable to flash the MediaTek CPU phones which support USB flashing. This topic will help you to flash MTK phones, which support USB flashing i.e. MT625A/62xx using volcano JIG Cable, that means no need to use USB cable to flash this type of phone. If the USB cable damage or not detect the phone then this process will solve these problems. For more details about this please see the below details.
What does it means?
Normally when you flash a phone which has MTK CPU 625A or 62xx, you are using a USB cable for this. When click on Start on Volcano Tool to flash MTK phone you see Analysis of USB port,Please insert phone USB cable then you insert the USB cable to the phone, but some times the phone is not detected with USB cable, in that case you can easily use the Volcano JIG cable as a USB cable to flash this type of phones.
Example:
Here is the example of Micromax X261 which has a MTK 6252 CPU and can be flash using USB cable on Volcano Tool, but here you will know how to flash this phone using Volcano Jig cable by using it USB cable.
How to Use Volcano Tool JIG as USB Cable?
Open volcano tool
Go to MTK tab
Select Read Flash
Choose Boot_11 v5.1232 (625A/62xx)
Select USB mode
Click on Start
See the below Image
 |
| Micromax X261 Read Flash Using Volcano JIG Cable |
Connect the phone using Volcano Tool JIG cable (i.e. Micromax x261)
After Click on Start
Go to Detect Tab
Select [D+/D-] MTK USB & Mstar Do Find Boot
Click on Detect ( After detecting complete)
Click on Set Pinout
 |
| Micromax X261 Set Pinout To Read Flash Volcano Tool |
Thats all it will read flash of Micromax X261 and you are done. In this way you can use the Volcano box JIG cable as USB cable to flash MTK 625A phones
Follow the above steps carefully to use volcano JIG as a USB Cable to flash MTK 625A/62xx phones.
Available link for download
Jagal yang Tidak Shalat Haram Menyembelihkan Hewan Kurban
Jagal yang Tidak Shalat Haram Menyembelihkan Hewan Kurban
Cara Instal Ulang Evercoss Winner Tab S3 Dengan Mudah - Sahabat pecinta android semua, kami akan berbagi dengan anda semua tentang bagaimana membuat atau instal ulang Evercoss Winner Tab S3 kamu, banyak hal yang menyebabkan kita perlu untuk instal ulang Evercoss Winner Tab S3 yang mulai karena bootloop hingga karena permasalahan lain yang teradi dihape Evercoss Winner Tab S3 kamu, jadi tidak perlu kwatir kami akan berbagi dengan anda semua tentang bagaimana kita akan instal ulang Evercoss Winner Tab S3 dengan mudah dan gampang.
Evercoss Winner Tab S3 adalah sebuah smartphone yang memakai sistem operasi android yang kita akan melakukan instal ulang android di dalamnya, dengan demikian maka kita akan mencoba menginstal ulang Evercoss Winner Tab S3, banyak hal yang menyebabkan Evercoss Winner Tab S3 anda ini perlu instal ulang, salah satunya yaitu karena anda melakukan root android di Evercoss Winner Tab S3 anda, sehingga Evercoss Winner Tab S3 anda mengalami sistem operasi error yang tidak bisa anda gunakan lagi untuk proses pemakaian hape, sehingga baru bisa apabila anda mengainstal versi android di hape lenovo kamu.
Untuk mengantisipasi kedepannya maka gunakanlah hape Evercoss Winner Tab S3 secara wajar dan jangan ulangi melakukan root Evercoss Winner Tab S3 anda karena bisa berakibat fatal jika anda tidak memahami bagaimana root android yang benar, pahami dahulu benar benar bahaya dan manfaat dari root android.
Baca juga ; Kelebihan Dan Kekurangan Root Android

Cara Instal Ulang Evercoss Winner Tab S3 Dengan Mudah
Berikut kami hadirkan ke anda semua tentang bagaimana melakukan instal ulang Evercoss Winner Tab S3 dengan mudah dan anda bisa melakukannya sendiri dirumah nantinya, silakan ikuti setiap step dan apabila cara yang kami bagikan ini tentang cara instal ulang Evercoss Winner Tab S3 ini maka silakan cari artikel lainnya di google sebagai bandingan saja.
1. Siapkan costum ROM untuk Evercoss Winner Tab S3 dan silakan download di situs resmi Evercoss Winner Tab S3 kamu.
2. setelah di didownload maka silakan anda pindahkan ke micro sd anda.
3. matikan hape Evercoss Winner Tab S3 anda dan silakan masuk kemenu recovery mode.
4. anda bisa masuk kemenu recovery dengan menekan tombol power bersamaan dengan tombol volume down di Evercoss Winner Tab S3, jika tidak bisa masuk silakan cari reveresi di google cara masuk recovery mode di Evercoss Winner Tab S3.
5. jika sudah masuk recovery nanti ada pilihan instal zip from sd card, silakan anda pilih dengan menggerser dengan tombol volume down dan up, tekan tombol power untuk yes atau ok.
6. dan silakan tunggu karena proses instal ulang Evercoss Winner Tab S3 sedang berjalan.
Demikianlah Cara Instal Ulang Evercoss Winner Tab S3 Dengan Mudah, semoga bisa bermanfaat untuk kita semua dan silakan baca artikel kami yang lainnya untuk bisa menambah ilmu.
Available link for download
Saturday, July 29, 2017
Facebook Beta gets an update seems way snappier now
Facebook Beta gets an update seems way snappier now
Another "no change log" update from Microsoft for its Facebook Beta app, and the app definitely seems more stable and quick now. The change log tells the usual "performance improvements and bug fixes", but it seems more evident when you use the app.
For those of you who dont use the beta, I suggest you do, because Facebook Beta seems more responsive than the stable version.
 Get it at http://www.windowsphone.com/en-gb/store/app/facebook-beta/93da5d29-daf0-4783-9ed5-a87b33247ec6
Available link for download
Firmwares Nokia 109 RM 907 Version 04 10 Bi
Firmwares Nokia 109 RM 907 Version 04 10 Bi
Firmwares Nokia 109 RM-907 Version 04.10 Bi
- Phone Name : Nokia 109
- Product Type : RM-907
- Variant ID : 7117634621
- Varian Name : RM-907 APAC S1 BLACK STROKE ID C
- Product Code : 059Q8Q9
- Software Version : 04.10
- File Name : RM907 059Q8Q9 04.10 008.vpl
- File Size : 3.1 Kb
- File Name : RM907 059Q8Q9 04.10 008.dcp
- File Size : 11.82 Kb
- File Name : rm907 04.10.mcusw
- File Size : 26.22 Mb
- File Name : rm907 04.10.ppm s1
- File Size : 4.17 Mb
- File Name : rm907 04.10.image s1 059Q8Q9
- File Size : 15.97 Mb
- File Name : 059Q8Q9 simlock.sim
- File Size : 7.07 Kb
- File Name : P11302001dpi600.pcx
- File Size : 10.68 Kb
- File Name : P11302001dpi600 label layout.xml
- File Size : 4.61 Kb
- File Name : RM907 059Q8Q9 04.10 008.spr
- File Size : 2.1 Kb
- File Name : ccc 059Q8Q9.bin
- File Size : 916 Bytes
- File Name : hwc 059Q8Q9.bin
- File Size : 216 Bytes
- File Name : RM907 059Q8Q9 04.10 008 signature.bin
- File Size : 2.85 Kb
Available link for download
Info Libur Lebaran Cuti Bersama Nasional 2015
Info Libur Lebaran Cuti Bersama Nasional 2015
Berikut ini adalah data rangkuman berbagai instansi yang libur maupun masuk libur Lebaran 2015

Perbankan Libur Lebaran 16–20 Juli 2015
Bank Indonesia (BI) terus mengampanyekan Gerakan Nasional Nontunai. Apalagi pada musim penukaran uang yang kini marak dilakukan masyarakat menjelang Lebaran. Upaya itu dilakukan untuk menekan jumlah uang yang beredar di masyarakat.Selain itu, hal tersebut dilakukan untuk memperluas akses keuangan masyarakat terhadap layanan perbankan. ’’Anak kecil dan remaja zaman sekarang ini sudah pandai-pandai. Kan bisa transfer saja lewat rekening ponsel. Gaya dikit lah mau Lebaran,’’ ujar Deputi Kepala Perwakilan BI Jawa Timur (Jatim) Syarifuddin Bassara.
Menurut dia, anak-anak adalah golongan yang patut diberi perhatian lebih soal inklusi keuangan. Sebab, belum banyak anak yang punya rekening tabungan di bank. Padahal, banyak dari mereka yang sudah mempunyai gadget yang canggih.
Hal itu tentu bertolak belakang dengan pendidikan mengenai sikap konsumtif. ’’Lebih baik transfer saja. Selain mengurangi jumlah uang yang beredar, itu bisa menghambat sikap konsumtif anak-anak dan supaya e-money-nya tidak langsung diuangkan. Meski di beberapa tempat bisa juga belanja pakai e-money,’’ papar pria yang kerap disapa Uddin itu.
Tidak hanya soal edukasi dan inklusi keuangan, pemberian angpau Lebaran lewat transaksi nontunai juga lebih aman. Sebab, anak-anak tidak membawa banyak uang tunai secara fisik. Orang yang membawa banyak uang tunai selalu rentan menjadi korban kejahatan. Karena itu, jika anak-anak tersebut membawa uang dalam ponsel mereka, kemungkinan mereka untuk menjadi korban kejahatan bisa dikurangi.
Dengan menggunakan transaksi nontunai, selain tidak perlu repot datang ke bank, pemberi angpau Lebaran hemat waktu dan tenaga. Mereka juga akan terhindar dari kemungkinan mendapat uang palsu. Apalagi jika penukaran uang tersebut dilakukan bukan di BI, bank umum, dan Bank Perkreditan Rakyat (BPR) yang melayani penukaran uang kecil.
’’Kalau tukar uang di pinggir jalan, rentan mendapatkan jumlah uang yang berkurang dari aslinya dan rentan ditukar dengan uang palsu. Makanya, hati-hati dan tukarlah uang hanya di outlet resmi. Gratis,’’ ucapnya.
Jumlah uang palsu di Jatim per Mei 2015 mencapai 12.740 bilyet. Jumlah tersebut naik dari periode yang sama pada tahun lalu yang hanya 10.889 bilyet. Pada Lebaran nanti, BI Jatim mulai menutup segala aktivitas mulai 16 hingga 20 Juli 2015. BI kembali buka pada 21 Juli 2015 dan hanya melayani secara terbatas, yakni kas, kliring, dan real time gross settlement (RTGS).
PNS Diwajibkan Masuk Kembali 22 Juli
Seluruh Pegawai Negeri Sipil (PNS) di lingkungan Pemerintah Kota (Pemko) Banda Aceh, diwajibkan masuk kembali kekantor pada Rabu 22 Juli 2015 setelah melaksanakan libur bersama dan cuti hari raya Idul Fitri 1436 H yang akan dimulai dari Kamis 16 Juli nanti.
Kepala Bagian Humas Sekretariat Daerah Kota Banda Aceh, Marwan menyebutkan, penetapan ini berdasarkan keputusan bersama Menteri Agama, Menteri Tenaga Kerja dan Transmigrasi, dan Menteri Pendayagunaan Aparatur Negara dan Reformasi Birokrasi RI dengan Nomor 5 Tahun 2014, Nomor 3/SKB/MEN/V/2014, dan Nomor 2/SKB/MENPAN/V/2014 tentang Hari Libur Nasional dan Cuti Bersama Tahun 2015.
Libur Idul Fitri atau hari libur nasional tahun ini ditetapkan pada Jumat-Sabtu (17-18 Juli). Sedangkan cuti bersama ditetapkan Kamis, Senin, dan Selasa (16, 20, dan 21 Juli).
“Tanggal 22 Juli seluruh PNS diwajibkan masuk kantor, kecuali sakit dan cuti. Apabila ada yang tidak masuk maka dikenakan sanksi berupa pemotongan TPK (Tunjangan Prestasi Kerja, red),” kata Marwan.
Seperti pada tahun-tahun sebelumnya, lanjut Marwan, pada hari pertama kerja setelah libur lebaran, tim Pemko juga akan melakukan monitoring ke seluruh SKPD. Tim ini akan dipimpin langsung oleh Wali Kota, Wakil Wali Kota, dan Sekda.

LIBUR LEBARAN tersebut berdasar keputusan bersama Kementerian Agama, Kementerian PU dan Transmigrasi serta Kemenpan RB. Surat edaran hari libur akan diumumkan ke setiap instansi pemerintah pusat dan daerah.
Adapun libur dan cuti bersama di lingkup perbankan mulai 16 Juli hingga 20 Juli 2015. HAL tersebut sesuai surat edaran BI melalui situs resmi bi.go.id.
Penetapan hari raya Idul Fitri baru diumumkan usai sidang isbat. NAMUN kemungkinan lebaran tahun ini serentak 17 Juli 2015. ORMAS MUHAMMADIYAH sudah menetapkan 1 Syawal 1436 Hijriah jatuh pada 17 Juli 2015.
references by jawapos, indopos,
Available link for download
How to Add Aero ON OFF Shortcuts in Desktop and My Computer Context Menu in Windows Vista and 7
How to Add Aero ON OFF Shortcuts in Desktop and My Computer Context Menu in Windows Vista and 7
In Windows Vista and Windows 7, whenever you want to turn Aero process ON or OFF to enable or disable Aero glass effect, you have to do it either from Desktop Properties or from System properties. But did you know there is a very easy shortcut to do it within seconds?
Here are 2 commands to turn Aero ON / OFF which are used by Windows Vista and 7:
Command to Turn Aero ON: Rundll32 dwmApi #102
Alternative command to Turn Aero ON: sc start uxsms
Command to Turn Aero OFF: Rundll32 dwmApi #104
Alternative command to Turn Aero OFF: sc stop uxsms
You can give the commands in RUN dialog box or Start Menu Searchbox. You can also create their shortcuts on Desktop or Quick Launch or wherever you want. It can become quite handy in lots of situations like a software has disabled Aero because it was not compatible with Aero or if you are running out of battery in your laptop, etc.
You can also add these commands in Desktop context menu or My Computer context menu. e.g. when youll right-click on Desktop or My Computer icon, youll find the shortcuts of "Aero ON" and "Aero OFF" there.
Following is a step-by-step tutorial to Add "Aero ON" and "Aero OFF" options in Desktop and My Computer Context Menu:
Add "Aero ON" and "Aero OFF" in Desktop Context Menu:

1. Type regedit in RUN dialog box and press Enter. Now go to:
HKEY_CLASSES_ROOTDirectoryBackgroundshell
2. Right-click on the "Shell" key and select "New -> Key".
3. Give it name Aero ON.
4. Now create another key under "Aero ON" with the name "command" and in right-side pane set value of "Default" to:
Rundll32 dwmApi #102
If the above command doesnt work for you, you can use following command as value:
sc start uxsms
5. Now repeat steps 2-4 to add "Aero OFF" option, i.e. Right-click on the "Shell" key and select"New -> Key".
6. Give it name Aero OFF.
7. Now create another key under "Aero OFF" with the name "command" and in right-side pane set value of "Default" to:
Rundll32 dwmApi #104
If the above command doesnt work for you, you can use following command as value:
sc stop uxsms
8. Thats it. Now youll get both "Aero ON" and "Aero OFF" options in Desktop Context Menu.
Add "Aero ON" and "Aero OFF" in My Computer Context Menu:

1. Type regedit in RUN dialog box and press Enter. Now go to:
HKEY_CLASSES_ROOTCLSID{20D04FE0-3AEA-1069-A2D8-08002B30309D}shell
2. Right-click on the "Shell" key and select "New -> Key".
3. Give it name Aero ON.
4. Now create another key under "Aero ON" with the name "command" and in right-side pane set value of "Default" to:
Rundll32 dwmApi #102
If the above command doesnt work for you, you can use following command as value:
sc start uxsms
5. Now repeat steps 2-4 to add "Aero OFF" option, i.e. Right-click on the "Shell" key and select"New -> Key".
6. Give it name Aero OFF.
7. Now create another key under "Aero OFF" with the name "command" and in right-side pane set value of "Default" to:
Rundll32 dwmApi #104
If the above command doesnt work for you, you can use following command as value:
sc stop uxsms
8. Thats it. Now youll get both "Aero ON" and "Aero OFF" options in My Computer Context Menu.
NOTE: There is also another similar command "Rundll32 dwmApi #105" which is used to run "Flip 3D". You can also add it in My Computer or desktop Context Menu by following the above mentioned steps.
------------------------------------------------------------------------------------
Your business needs pertaining to cloud backup service, tech support and CRM will be satiated in the best way at Techvedic. Just a click and we are at your doorstep.
About Techvedic: http://en.wikipedia.org/wiki/Techvedic
Get in touch with Techvedic on Social Media:
Techvedic Facebook Page: https://www.facebook.com/techvedic
Techvedic Twitter:https://twitter.com/techvedic
Techvedic Google Plus Page: https://plus.google.com/+TechvedicInc/posts
Techvedic YouTube:https://www.youtube.com/user/Techvedic
Techvedic LinkedIn Profile: https://www.linkedin.com/company/techvedic
Visit:Techvedic – Ecommerce Solutions | http://www.techvedic.co.uk/ | 0800 016 3909 (UK) | support@techvedic.com
Available link for download
How to move Apps Games from Internal storage to SD Card in Nokia X X XL
How to move Apps Games from Internal storage to SD Card in Nokia X X XL
tags: cara root redmi xiaomi 1s tanpa pc, tanpa komputer, install cwm, aplikasi rooting, root android tanpa laptop, xda developers, kaskus, spesifikasi, harga, spec, cara unroot ponsel remi xiaomi, hp murah

- Aktifkan Developer Option, caranya masuk ke menu Settings > About Phone > tap sebanyak 5x pada Android Version hingga Developer Option aktif.
- Download file rootnya DISINI , kemudian copykan ke sdcard di luar folder.
Flashing
- Matikan ponsel.
- Masuk ke mode recovery, caranya tekan tombol Volume Atas + Power hinggga masuk ke recovery mode. Gunakan tombol Volume Atas dan Volume Bawah untuk navigasi atau mengarahkan, sedangkan tombol Power untuk memilih.
- Setelah itu pilih English > Install update.zip to system > pilih Yes. Tunggu hingga selesai.
- Setelah selesai, pilih Back > Reboot > Reboot to system.
- Setelah ponsel menyala kembali, Anda masuk ke menu Security > Permission > klik Root Permission untuk mengaktifkan akses root. Nah, setelah bagian ini, berarti Xiaomi Redmi 1s Anda telah berhasil di Root.

Cara Unroot
- Hapus file update.zip dari internal memory.
- Pindahkan file UnRoot.zip ke internal memory.
- Rename file UnRoot.zip menjadi update.zip
- Setelah ini masuk ke Recovery Mode, dan prosesnya sama seperti saat rooting.
File unrootnya bisa Anda download di bawah ini:
Available link for download
Friday, July 28, 2017
How to recover lost data for iPhone 4S after upgrade to ios6
How to recover lost data for iPhone 4S after upgrade to ios6

Rumor mengenai kemungkinan rencana pengumuman Xperia Z4 di acara CES 2015 mendatang nampaknya akan terbukti setelah beberapa bocoran mengenai smartphone tersebut terus bermunculan. Setelah rumor mengenai pemakaian layar resolusi QHD, sebuah rumor kembali diungkap oleh sumber anonim kepada Phone Arena beberapa saat yang lalu bersama bocoran gambarnya.
Menurut rumor terbaru ini, Xperia Z4 akan memakai layar Triluminos 5,4 inci resolusi QHD dengan chipset Snapdragon 805, bukan Snapdragon 810 seperti yang disebut di rumor sebelumnya. Penggunaan Snapdragon 805 diperkirakan lebih masuk akal jika melihat tren penggunaan chip pada smartphone andalan Sony selama ini yang biasanya satu tingkat di bawah chipset terbaru.
Informasi yang cukup mengejutkan adalah kemungkinan penggunaan RAM 4GB di Xperia Z4. Meskipun Android Lollipop kemungkinan akan dipasang dan memang mendukung RAM hingga 4GB, namun penggunaan RAM 4GB ini dinilai terlalu berlebihan dan kemungkinan akan menaikkan harga jualnya.


Kamera yang dipasang di Xperia Z4 masih memakai sensor 20,7 MP namun menggunakan sensor generasi baru yang belum lama ini diumumkan. Kamera depan untuk selfie akan ditingkatkan menjadi 4,8 megapiksel sudut lebar, setara dengan kamera pada ponsel-ponsel selfie yang sekarang sedang ngetren. Baterainya akan berkapasitas 3420 mAh dan diperkirakan memiliki daya tahan baterai yang bagus. Dari segi desain hanya disebutkan bahwa bagian atas dan bawah bezelnya akan lebih tipis dengan sudut lebih membulat.
Untuk Sony Xperia Z4 Ultra menurut rumor ini disebut akan memakai layar Triluminos 5,9 inci dengan chip Snapdragon 805 dan RAM 4 GB. Kamera belakangnya memiliki resolusi 16 megapiksel dengan lampu kilat LED.
Apakah rumor ini akan menjadi kenyataan nantinya?
SOURCE
Available link for download
How To Use Display Filters In Wireshark
How To Use Display Filters In Wireshark
Wireshark is a GUI-based network packet analyser that lets you inspect packet data from a live network as well as from a previously captured file. Although it’s a very powerful tool, a common problem that newbies face is that it displays so much data that it becomes really difficult for them to pinpoint the actual information they are looking for. This is where Wireshark’s display filters help.
Note – If you are completely new to Wireshark, it is recommended that you first go through its basic tutorial.
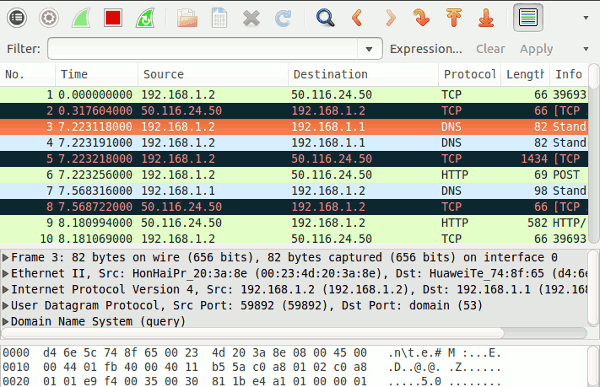
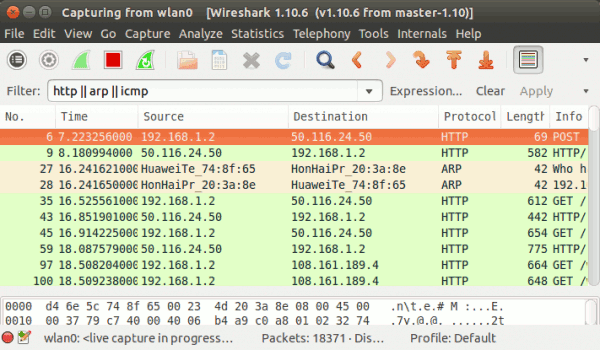
Note that a major part of the GUI is used to display information (like Time, Source, Destination, and more) about all the incoming and outgoing packets. To filter this information as per your requirement, you need to make use of the Filter box present at the top of the window.
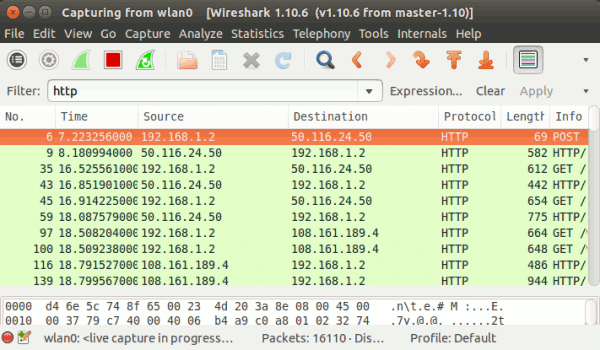
Observe that the Protocol column contains only HTTP entries. If information related to more than one protocol is required, enter the protocol names separated by a double pipe (or a logical OR operator) ||
Similarly, use ip.dst to filter results based on destination IP address. To display both source and destination packets with a particular IP, use the ip.addr filter. Here is an example:
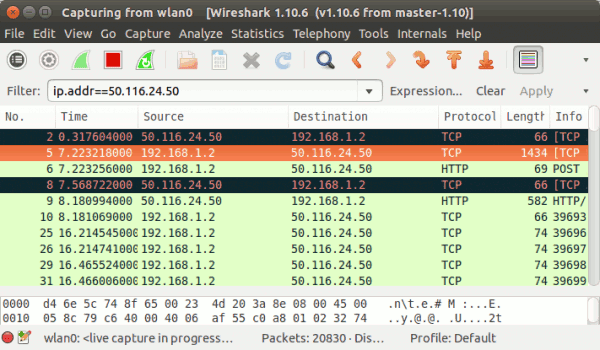
Observe that the packets with source or destination IP address as 50.116.24.50 are displayed in the output.
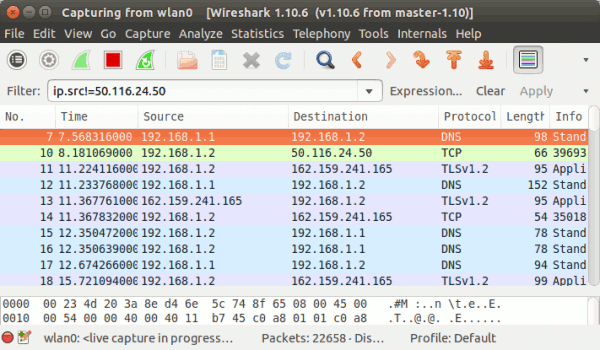
To exclude packets with a specific IP address, use the != operator. Here is an example:
Similarly, you can use tcp.srcport and tcp.dstport to separately filter results based on TCP source and destination ports, respectively.
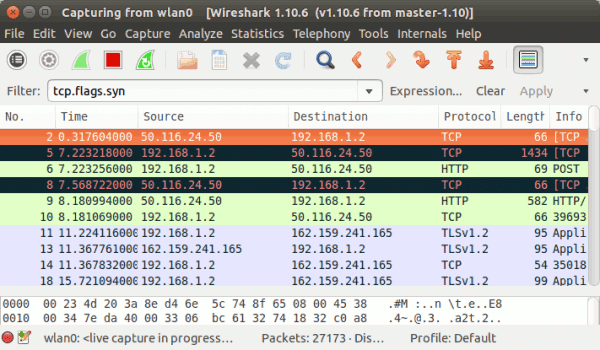
Wireshark also has the ability to filter results based on TCP flags. For example, to display on those TCP packets that contain SYN flag, use the tcp.flags.syn filter. Here is an example:
Similarly, you can also filter results based on other flags like ACK, FIN, and more, by using filters like tcp.flags.ack , tcp.flags.fin and more respectively.
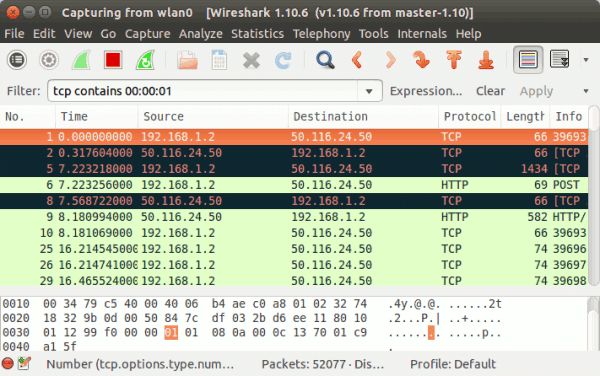
For example, TCP packets containing the 00 00 01 byte sequence can be filtered using the following way:
Moving on, just like you can filter results based on IP addresses (explained earlier), you can also filter results based on MAC addresses, using the eth.addr filter. For example, to see all the traffic coming in and out of a machine with mac address, say AA:BB:CC:DD:EE:FF, use the following filter command:
Note – If you are completely new to Wireshark, it is recommended that you first go through its basic tutorial.
Display Filters
1. Filter Information Based On Protocol
To filter results based on a specific protocol, just write its name in the filter box and hit enter. For example, the following screen shot displays information related to the HTTP protocolhttp || arp || icmp
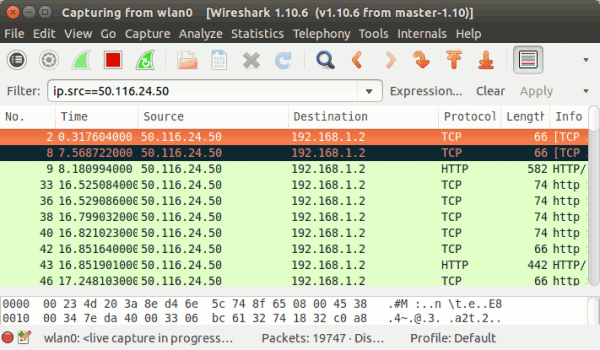
2. Filter Information Based On IP Address
To filter results based on source IP, use the ip.src filter. Here is an example:ip.src==50.116.24.50
ip.addr==50.116.24.50
To exclude packets with a specific IP address, use the != operator. Here is an example:
ip.src!=50.116.24.50
3. Filter Information Based On Port
You can also filter the captured traffic based on network ports. For example, to display only those packets that contain TCP source or destination port 80, use the tcp.port filter. Here is an example:tcp.port==80
Wireshark also has the ability to filter results based on TCP flags. For example, to display on those TCP packets that contain SYN flag, use the tcp.flags.syn filter. Here is an example:
4. Some Other Useful Filters
Wireshark displays the data contained by a packet (which is currently selected) at the bottom of the window. Sometimes, while debugging a problem, it is required to filter packets based on a particular byte sequence. You can easily do that using Wireshark.For example, TCP packets containing the 00 00 01 byte sequence can be filtered using the following way:
tcp contains 00:00:01
eth.addr == AA:BB:CC:DD:EE:FF
I Hope This Article Helps You If You Getting Any Problem Related To This Article You Can Comment By Below Comment Box We Will Help You And If You Need Any Trick Or Software Or Hack You Can Mail Us We Will Try To Give That Article We Happy To Help You All Guys.Thank You Share And Subscribe Us. #Pankaj Patidar Rock
Dont Forget To Like And Follow..
Available link for download
How To Blackberry Z10 Block Solution Just Free Download NOW Full 2015
How To Blackberry Z10 Block Solution Just Free Download NOW Full 2015
How To Blackberry Z10 Block Solution Just Free Download NOW Full 2015

Blackberry Z10 Read Light Solution
Blackberry Z10 Hang Solution
Blackberry Z10 Block Solution
Blackberry Z10 10Left Password Solution
FAQ}-Blackberry z10 {Hang / Block / 10 Left Password / Red Light } ETC
HI Guys,
I seen in forum always user posting to BB Section about z10 hang on logo , Red light , blocked password Etc problem . So let’s me explain here about these problem and solution . Kindly next time before post fellow my solution
I seen in forum always user posting to BB Section about z10 hang on logo , Red light , blocked password Etc problem . So let’s me explain here about these problem and solution . Kindly next time before post fellow my solution
Update With BB Link/Autoloader :
You can update your phone with Autoloader Remember you must use your same STL OS (EXAMPLE – STL100-1 ETC). STL version have in your phone back side . So you can download
You can update your phone with Autoloader Remember you must use your same STL OS (EXAMPLE – STL100-1 ETC). STL version have in your phone back side . So you can download
correct OS for your Phone . Also you can update your phone with BB Link Its Online updater , 1st time take long time for Os downloading 2nd time no need long time , Cases you have download already !
Remember Some time unable to detect on BB Link , This case Simple wipe your Phone With CFP ( I already share in below ) Then connect to BB Link !
Hang On Logo / Red light :
1st try to update Autoloader Or BB Link . Remember if you try with Autoloader you must you same STL Version
If after update Still hang on logo , your problem is not solve So just wipe your phone with CFP For Blackberry Z10 By AzimBahar Then Update your phone
Password Block/10 Left :
1st you need use CFP For Blackberry Z10 By AzimBahar . This case connecting is impotent . You may connect too way . 1st run WIPE from CFT tools then connect phone and entry password 10 time. If same,
Once again Run WIPE and connect phone without battery and entry password 10 time.
After wipe update your phone that’s it
Impotent note :
If after wipe phone not connect to PC , Then connect battery to phone wait few min
These way tested By me 50 more time
Available link for download
Get Unlimited net Domain Free
Get Unlimited net Domain Free
Hey Friends I Am Back With Superb Trick By Which You Can Get Unlimited Domain Name From BigRock.
I Hope This Article Helps You If You Getting Any Problem Related To This Article You Can Comment By Below Comment Box We Will Help You And If You Need Any Trick Or Software Or Hack You Can Mail Us We Will Try To Give That Article We Happy To Help You All Guys.Thank You Share And Subscribe Us. #Pankaj Patidar Rock
Steps To Follow
- Open Google Chrome Incognito Window.
- Click Here To Visit BigRock.
- Search Your Domain Name And Add To Cart.
- Click On CheckOut.
- Click On Remove To Remove Charge Of Privacy Protection .
- Click On Apply Coupon.
- Finally Click On Proceed To Payment And Get Your Domain Free.
More Coupons : FLX8689D431 , FLX5E372D04 , FLXC16D796A
I Hope This Article Helps You If You Getting Any Problem Related To This Article You Can Comment By Below Comment Box We Will Help You And If You Need Any Trick Or Software Or Hack You Can Mail Us We Will Try To Give That Article We Happy To Help You All Guys.Thank You Share And Subscribe Us. #Pankaj Patidar Rock
Dont Forget To Like And Follow..
Available link for download
Google Nik Software 1 2 11 Cracked Mac OSX
Google Nik Software 1 2 11 Cracked Mac OSX
Htc sensation 4g T-Mobile Unlock cài Ti?ng Vi?t ok
![[IMG]](http://i.imgur.com/4NikuaB.png)
![[IMG]](http://i.imgur.com/OJkgujy.png)
![[IMG]](http://i.imgur.com/mbAgOtV.png)
![[IMG]](http://i.imgur.com/LQjQ1Gj.png)
![[IMG]](http://i.imgur.com/M0SJZEj.png)
![[IMG]](http://i.imgur.com/91MTMTW.png)
![[IMG]](http://i.imgur.com/ZN0aLxj.png)
Available link for download
Subscribe to:
Posts (Atom)