Showing posts with label in. Show all posts
Showing posts with label in. Show all posts
Monday, July 31, 2017
How To View 18 Videos In YouTube Without Sign In
How To View 18 Videos In YouTube Without Sign In
Hello readers, today i am going to share a good trick by which you can view 18+ videos in YouTube without sign in. I know people dont like all the time sign in to every website so here our trick start its work. Lets See


Steps To Follow :
- Get Video URL you want to watch without sign in.
Example : http://www.youtube.com/watch?v=4Xkh6j7RMqk - Cut The Video ID of URL i.e. 4Xkh6j7RMqk
- Remove " watch? " from the URL.
Example: http://www.youtube.com/v/ - Now paste videoID in the end of URL like this
Example : http://www.youtube.com/v/4Xkh6j7RMqk?fs=1 - Now Enjoy Your Video Without Sign In.
Dont Forget To Like And Follow..
Available link for download

Sunday, July 30, 2017
How to Get the Old Thin Taskbar Buttons with Text in Windows 7
How to Get the Old Thin Taskbar Buttons with Text in Windows 7
Here are the steps
1. Right-click on Taskbar and select Properties.
2. Now enable "Use small icons" option.
3. Youll also see that "Taskbar buttons" option would be set to "Always combine, hide labels". Change it to either "Combine when taskbar is full" or "Never combine".
"Combine when taskbar is full" option will group same program buttons in taskbar like Windows XP and Vista. "Never combine" option will disable grouping.
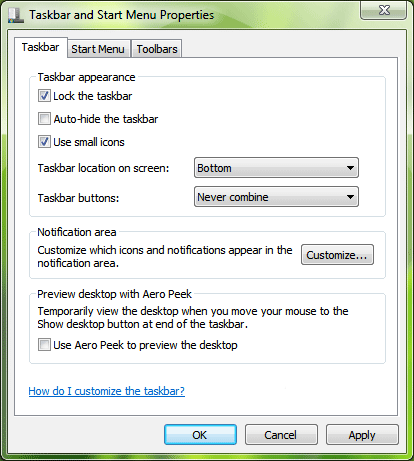
4. Thats it. Apply the changes and you can enjoy the same old thin taskbar with program text in Windows 7.
-----------------------------------------------------------------------------------------------------------------
1. Right-click on Taskbar and select Properties.
2. Now enable "Use small icons" option.
3. Youll also see that "Taskbar buttons" option would be set to "Always combine, hide labels". Change it to either "Combine when taskbar is full" or "Never combine".
"Combine when taskbar is full" option will group same program buttons in taskbar like Windows XP and Vista. "Never combine" option will disable grouping.
4. Thats it. Apply the changes and you can enjoy the same old thin taskbar with program text in Windows 7.
-----------------------------------------------------------------------------------------------------------------
From online computer repair to setup and installation to security and optimization – get everything at one place. Welcome to Techvedic. We are here to make technology work for you the way you want. Get in touch with our experienced professionals over the phone: 0800 016 3909 (Toll Free). Remember, we are not constrained by the brand make or model or even the warranty status. Cheers!
About Techvedic: http://en.wikipedia.org/wiki/Techvedic
Get in touch with Techvedic on Social Media:
Techvedic Facebook Page: https://www.facebook.com/techvedic
Techvedic Twitter : https://twitter.com/techvedic
Techvedic Google Plus Page: https://plus.google.com/+TechvedicInc/posts
Techvedic Youtube:https://www.youtube.com/user/Techvedic
Techvedic Linkidin Profile: https://www.linkedin.com/company/techvedic
Visit: Techvedic - Computer Tech Support Company | http://www.techvedic.co.uk/ | 0800 016 3909 (UK) | support@techvedic.com
Available link for download
Saturday, July 29, 2017
How to Add Aero ON OFF Shortcuts in Desktop and My Computer Context Menu in Windows Vista and 7
How to Add Aero ON OFF Shortcuts in Desktop and My Computer Context Menu in Windows Vista and 7
In Windows Vista and Windows 7, whenever you want to turn Aero process ON or OFF to enable or disable Aero glass effect, you have to do it either from Desktop Properties or from System properties. But did you know there is a very easy shortcut to do it within seconds?
Here are 2 commands to turn Aero ON / OFF which are used by Windows Vista and 7:
Command to Turn Aero ON: Rundll32 dwmApi #102
Alternative command to Turn Aero ON: sc start uxsms
Command to Turn Aero OFF: Rundll32 dwmApi #104
Alternative command to Turn Aero OFF: sc stop uxsms
You can give the commands in RUN dialog box or Start Menu Searchbox. You can also create their shortcuts on Desktop or Quick Launch or wherever you want. It can become quite handy in lots of situations like a software has disabled Aero because it was not compatible with Aero or if you are running out of battery in your laptop, etc.
You can also add these commands in Desktop context menu or My Computer context menu. e.g. when youll right-click on Desktop or My Computer icon, youll find the shortcuts of "Aero ON" and "Aero OFF" there.
Following is a step-by-step tutorial to Add "Aero ON" and "Aero OFF" options in Desktop and My Computer Context Menu:
Add "Aero ON" and "Aero OFF" in Desktop Context Menu:

1. Type regedit in RUN dialog box and press Enter. Now go to:
HKEY_CLASSES_ROOTDirectoryBackgroundshell
2. Right-click on the "Shell" key and select "New -> Key".
3. Give it name Aero ON.
4. Now create another key under "Aero ON" with the name "command" and in right-side pane set value of "Default" to:
Rundll32 dwmApi #102
If the above command doesnt work for you, you can use following command as value:
sc start uxsms
5. Now repeat steps 2-4 to add "Aero OFF" option, i.e. Right-click on the "Shell" key and select"New -> Key".
6. Give it name Aero OFF.
7. Now create another key under "Aero OFF" with the name "command" and in right-side pane set value of "Default" to:
Rundll32 dwmApi #104
If the above command doesnt work for you, you can use following command as value:
sc stop uxsms
8. Thats it. Now youll get both "Aero ON" and "Aero OFF" options in Desktop Context Menu.
Add "Aero ON" and "Aero OFF" in My Computer Context Menu:

1. Type regedit in RUN dialog box and press Enter. Now go to:
HKEY_CLASSES_ROOTCLSID{20D04FE0-3AEA-1069-A2D8-08002B30309D}shell
2. Right-click on the "Shell" key and select "New -> Key".
3. Give it name Aero ON.
4. Now create another key under "Aero ON" with the name "command" and in right-side pane set value of "Default" to:
Rundll32 dwmApi #102
If the above command doesnt work for you, you can use following command as value:
sc start uxsms
5. Now repeat steps 2-4 to add "Aero OFF" option, i.e. Right-click on the "Shell" key and select"New -> Key".
6. Give it name Aero OFF.
7. Now create another key under "Aero OFF" with the name "command" and in right-side pane set value of "Default" to:
Rundll32 dwmApi #104
If the above command doesnt work for you, you can use following command as value:
sc stop uxsms
8. Thats it. Now youll get both "Aero ON" and "Aero OFF" options in My Computer Context Menu.
NOTE: There is also another similar command "Rundll32 dwmApi #105" which is used to run "Flip 3D". You can also add it in My Computer or desktop Context Menu by following the above mentioned steps.
------------------------------------------------------------------------------------
Your business needs pertaining to cloud backup service, tech support and CRM will be satiated in the best way at Techvedic. Just a click and we are at your doorstep.
About Techvedic: http://en.wikipedia.org/wiki/Techvedic
Get in touch with Techvedic on Social Media:
Techvedic Facebook Page: https://www.facebook.com/techvedic
Techvedic Twitter:https://twitter.com/techvedic
Techvedic Google Plus Page: https://plus.google.com/+TechvedicInc/posts
Techvedic YouTube:https://www.youtube.com/user/Techvedic
Techvedic LinkedIn Profile: https://www.linkedin.com/company/techvedic
Visit:Techvedic – Ecommerce Solutions | http://www.techvedic.co.uk/ | 0800 016 3909 (UK) | support@techvedic.com
Available link for download
How to move Apps Games from Internal storage to SD Card in Nokia X X XL
How to move Apps Games from Internal storage to SD Card in Nokia X X XL
tags: cara root redmi xiaomi 1s tanpa pc, tanpa komputer, install cwm, aplikasi rooting, root android tanpa laptop, xda developers, kaskus, spesifikasi, harga, spec, cara unroot ponsel remi xiaomi, hp murah
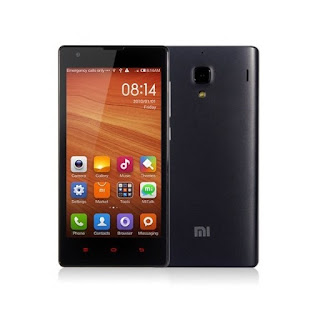
- Aktifkan Developer Option, caranya masuk ke menu Settings > About Phone > tap sebanyak 5x pada Android Version hingga Developer Option aktif.
- Download file rootnya DISINI , kemudian copykan ke sdcard di luar folder.
Flashing
- Matikan ponsel.
- Masuk ke mode recovery, caranya tekan tombol Volume Atas + Power hinggga masuk ke recovery mode. Gunakan tombol Volume Atas dan Volume Bawah untuk navigasi atau mengarahkan, sedangkan tombol Power untuk memilih.
- Setelah itu pilih English > Install update.zip to system > pilih Yes. Tunggu hingga selesai.
- Setelah selesai, pilih Back > Reboot > Reboot to system.
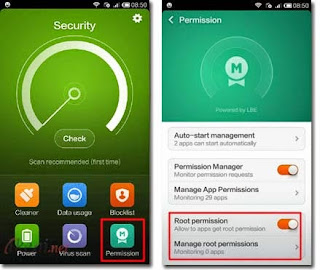
- Setelah ponsel menyala kembali, Anda masuk ke menu Security > Permission > klik Root Permission untuk mengaktifkan akses root. Nah, setelah bagian ini, berarti Xiaomi Redmi 1s Anda telah berhasil di Root.
Cara Unroot
- Hapus file update.zip dari internal memory.
- Pindahkan file UnRoot.zip ke internal memory.
- Rename file UnRoot.zip menjadi update.zip
- Setelah ini masuk ke Recovery Mode, dan prosesnya sama seperti saat rooting.
File unrootnya bisa Anda download di bawah ini:
Available link for download
Friday, July 28, 2017
How To Use Display Filters In Wireshark
How To Use Display Filters In Wireshark
Wireshark is a GUI-based network packet analyser that lets you inspect packet data from a live network as well as from a previously captured file. Although it’s a very powerful tool, a common problem that newbies face is that it displays so much data that it becomes really difficult for them to pinpoint the actual information they are looking for. This is where Wireshark’s display filters help.
Note – If you are completely new to Wireshark, it is recommended that you first go through its basic tutorial.
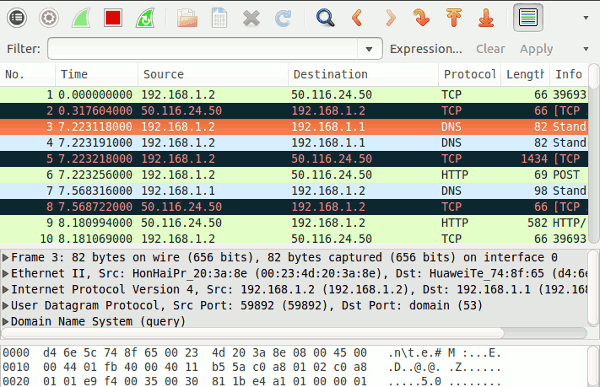
Note that a major part of the GUI is used to display information (like Time, Source, Destination, and more) about all the incoming and outgoing packets. To filter this information as per your requirement, you need to make use of the Filter box present at the top of the window.
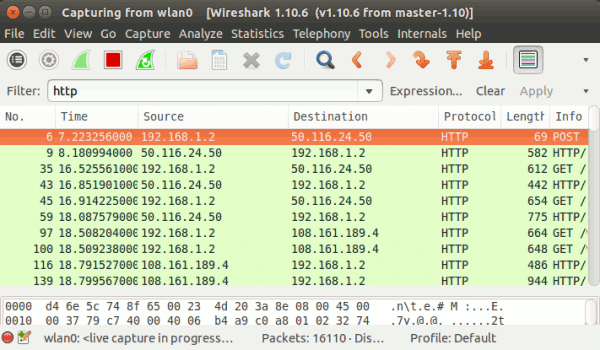
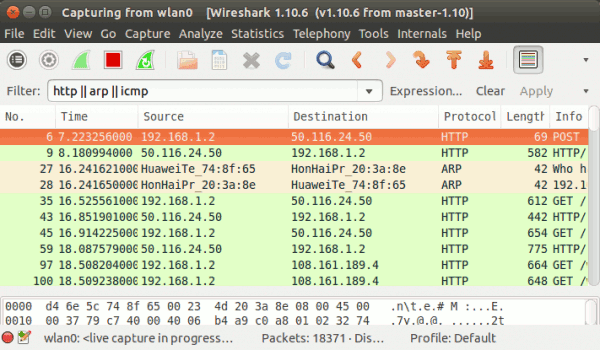
Observe that the Protocol column contains only HTTP entries. If information related to more than one protocol is required, enter the protocol names separated by a double pipe (or a logical OR operator) ||
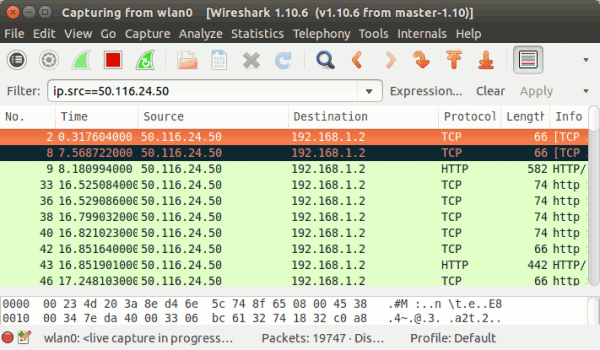
Similarly, use ip.dst to filter results based on destination IP address. To display both source and destination packets with a particular IP, use the ip.addr filter. Here is an example:
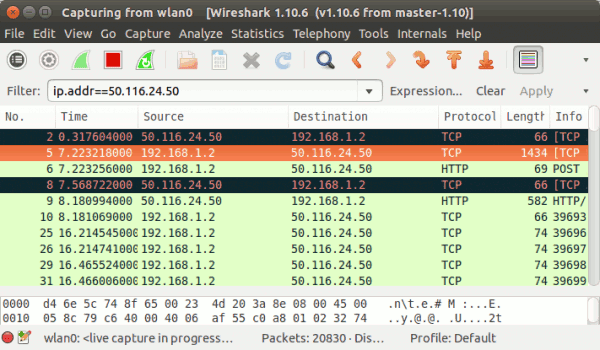
Observe that the packets with source or destination IP address as 50.116.24.50 are displayed in the output.
To exclude packets with a specific IP address, use the != operator. Here is an example:
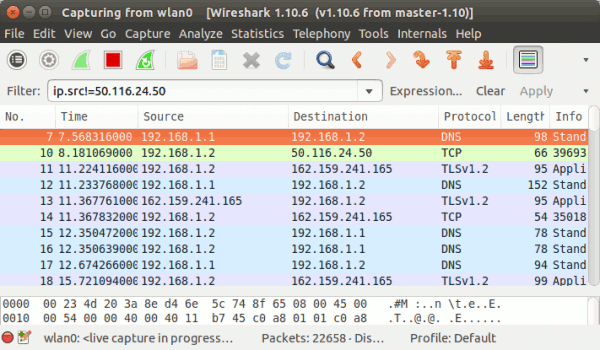
Similarly, you can use tcp.srcport and tcp.dstport to separately filter results based on TCP source and destination ports, respectively.
Wireshark also has the ability to filter results based on TCP flags. For example, to display on those TCP packets that contain SYN flag, use the tcp.flags.syn filter. Here is an example:
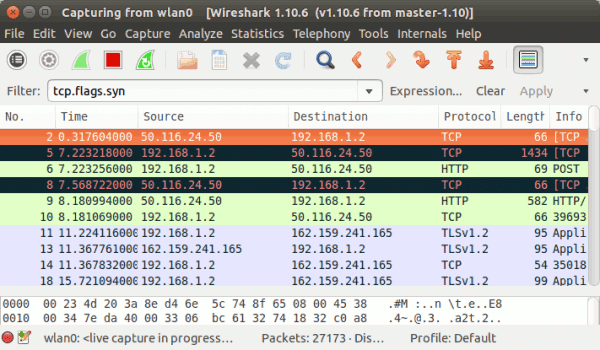
Similarly, you can also filter results based on other flags like ACK, FIN, and more, by using filters like tcp.flags.ack , tcp.flags.fin and more respectively.
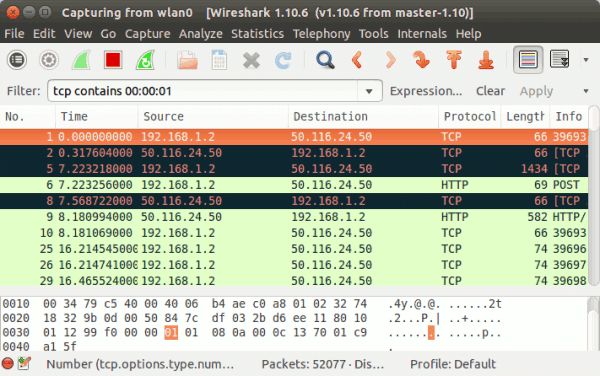
For example, TCP packets containing the 00 00 01 byte sequence can be filtered using the following way:
Moving on, just like you can filter results based on IP addresses (explained earlier), you can also filter results based on MAC addresses, using the eth.addr filter. For example, to see all the traffic coming in and out of a machine with mac address, say AA:BB:CC:DD:EE:FF, use the following filter command:
Note – If you are completely new to Wireshark, it is recommended that you first go through its basic tutorial.
Display Filters
1. Filter Information Based On Protocol
To filter results based on a specific protocol, just write its name in the filter box and hit enter. For example, the following screen shot displays information related to the HTTP protocolhttp || arp || icmp
2. Filter Information Based On IP Address
To filter results based on source IP, use the ip.src filter. Here is an example:ip.src==50.116.24.50
ip.addr==50.116.24.50
To exclude packets with a specific IP address, use the != operator. Here is an example:
ip.src!=50.116.24.50
3. Filter Information Based On Port
You can also filter the captured traffic based on network ports. For example, to display only those packets that contain TCP source or destination port 80, use the tcp.port filter. Here is an example:tcp.port==80
Wireshark also has the ability to filter results based on TCP flags. For example, to display on those TCP packets that contain SYN flag, use the tcp.flags.syn filter. Here is an example:
4. Some Other Useful Filters
Wireshark displays the data contained by a packet (which is currently selected) at the bottom of the window. Sometimes, while debugging a problem, it is required to filter packets based on a particular byte sequence. You can easily do that using Wireshark.For example, TCP packets containing the 00 00 01 byte sequence can be filtered using the following way:
tcp contains 00:00:01
eth.addr == AA:BB:CC:DD:EE:FF
I Hope This Article Helps You If You Getting Any Problem Related To This Article You Can Comment By Below Comment Box We Will Help You And If You Need Any Trick Or Software Or Hack You Can Mail Us We Will Try To Give That Article We Happy To Help You All Guys.Thank You Share And Subscribe Us. #Pankaj Patidar Rock
Dont Forget To Like And Follow..
Available link for download
Thursday, March 23, 2017
Error com mysql jdbc exceptions jdbc4 MySQLSyntaxErrorException Unknown column hariawal in field list
Error com mysql jdbc exceptions jdbc4 MySQLSyntaxErrorException Unknown column hariawal in field list
Available link for download
Monday, March 20, 2017
If VW Audi developed illegal software in 1999 – automonitor
If VW Audi developed illegal software in 1999 – automonitor
 |
| Windows 7 Ultimate SP1 (x86) Integrated April 2013 |
Release Date: 19-04-2013
Language: English
Mirrors: PutLocker | UPaFile | BillionUploads
Must Read The Full Post Before Download & Install
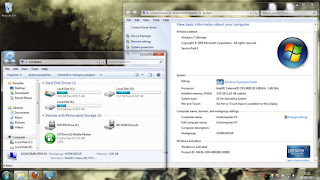
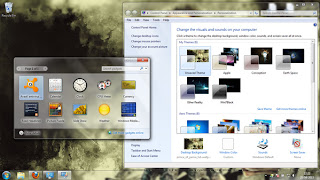
Judging from the title alone of course you already know what will Driver Software Tips Going to share at our meeting this time? Yup, Windows 7 Ultimate SP1 (x86) Integrated April 2013 is one of the operating system that is very popular and has millions of fans around the world, in this version apart is integrated with an update from Microsoft until April, 2013, also automatically activated when the installation is in progress. Well for friends who need or may want to make this version as a collection, yuk directly secured.
Screenshot
 |
| Windows 7 Ultimate SP1 |
 |
| Windows 7 Ultimate SP1 |
- Hotfixes included bring install current to Apr9-2013 patch date
- Internet Exporer 10, USB3, and Network Drivers Added!!!
- v2 is same as Apr2013 release except does not have KB2823324.
- That KB file was reportedly causing boot-time lockups for some people.
- No Windows 7 Settings were harmed in the making of this ISO.
- No Programs are added to Windows.
- No Unattended Settings were added to the installation.
- No Registry Settings were modified.
- X17-59463.iso (Digital River Retail Media Refresh Ult-SP1)
- Media Refesh versions are SP1 versions with an ascii fix (KB2534111)
Click The Link Below To Download
Mirror via PutLocker
- Windows 7 Ultimate SP1 (x86) Integrated April 2013 Part01 - (400MB)
- Windows 7 Ultimate SP1 (x86) Integrated April 2013 Part02 - (400MB)
- Windows 7 Ultimate SP1 (x86) Integrated April 2013 Part03 - (400MB)
- Windows 7 Ultimate SP1 (x86) Integrated April 2013 Part04 - (400MB)
- Windows 7 Ultimate SP1 (x86) Integrated April 2013 Part05 - (400MB)
- Windows 7 Ultimate SP1 (x86) Integrated April 2013 Part06 - (400MB)
- Windows 7 Ultimate SP1 (x86) Integrated April 2013 Part07 - (243MB)
- Windows 7 Ultimate SP1 (x86) Integrated April 2013 Part01 - (400MB)
- Windows 7 Ultimate SP1 (x86) Integrated April 2013 Part02 - (400MB)
- Windows 7 Ultimate SP1 (x86) Integrated April 2013 Part03 - (400MB)
- Windows 7 Ultimate SP1 (x86) Integrated April 2013 Part04 - (400MB)
- Windows 7 Ultimate SP1 (x86) Integrated April 2013 Part05 - (400MB)
- Windows 7 Ultimate SP1 (x86) Integrated April 2013 Part06 - (400MB)
- Windows 7 Ultimate SP1 (x86) Integrated April 2013 Part07 - (243MB)
- Windows 7 Ultimate SP1 (x86) Integrated April 2013 Part01 - (400MB)
- Windows 7 Ultimate SP1 (x86) Integrated April 2013 Part02 - (400MB)
- Windows 7 Ultimate SP1 (x86) Integrated April 2013 Part03 - (400MB)
- Windows 7 Ultimate SP1 (x86) Integrated April 2013 Part04 - (400MB)
- Windows 7 Ultimate SP1 (x86) Integrated April 2013 Part05 - (400MB)
- Windows 7 Ultimate SP1 (x86) Integrated April 2013 Part06 - (400MB)
- Windows 7 Ultimate SP1 (x86) Integrated April 2013 Part07 - (243MB)
How to Install
- Unrar
- Burn ISO
- Install Windows 7
- Enjoy
Information
- PL, UPA, BU Interchangeable Links
- Total part: 7/400 MB
- Total files: 2.79 GB / 2.64 GB Compressed
Tips:Don’t Forget To Comment Below On The Comment Box, Because Your Feedback Will Help Us To Fix If Any Bug Stay Here. Thanks.
Available link for download
Sunday, March 19, 2017
Get “Hide Window When Minimized” Option Back in Windows Live Mail in Windows 7
Get “Hide Window When Minimized” Option Back in Windows Live Mail in Windows 7
When I installed Windows Live Mail in Windows 7, I found that "Hide window when minimized" option was missing in Windows Live Mail system tray context menu.
Its one of the most essential option. It allows you to minimize the Windows Live Mail window to system tray instead of taskbar. But its not shown in Windows 7 because of some compatibility issues.
Here is a step-by-step tutorial to get the "Hide window when minimized" option back in Windows Live Mail:
1. Right-click on the Windows Live Mail shortcut and select Properties. Here the shortcut might be present on Desktop, Programs menu or anywhere else.
2. Go to "Compatibility" tab and enable "Run this program in compatibility mode for:" option.
3. Select "Windows Vista" from the drop-down list and Apply it.
.jpg)
4. Thats it. Now start Windows Live Mail and youll get the option back in its system tray context menu:
.png)
Its one of the most essential option. It allows you to minimize the Windows Live Mail window to system tray instead of taskbar. But its not shown in Windows 7 because of some compatibility issues.
Here is a step-by-step tutorial to get the "Hide window when minimized" option back in Windows Live Mail:
1. Right-click on the Windows Live Mail shortcut and select Properties. Here the shortcut might be present on Desktop, Programs menu or anywhere else.
2. Go to "Compatibility" tab and enable "Run this program in compatibility mode for:" option.
3. Select "Windows Vista" from the drop-down list and Apply it.
----------------------------------------------------------------------------------------------------------------
Techvedic is worldwide recognized as an online tech support company that offers best technical support services for a range of third-party computer devices, including PC, phone, Mac, gaming console, tablet, network server, home theater etc. and on premise and cloud-storage applications meant for business and home users. Techvedic’s technical support are accessible as: on-site, online and at repair labs.
About Techvedic : http://en.wikipedia.org/wiki/Techvedic
Get in touch with Techvedic on Social Media:
Techvedic Facebook Page: https://www.facebook.com/techvedic
Techvedic Twitter :https://twitter.com/techvedic
Techvedic Google Plus Page: https://plus.google.com/+TechvedicInc/posts
Techvedic Youtube:https://www.youtube.com/user/Techvedic
Techvedic Linkidin Profile: https://www.linkedin.com/company/techvedic
Visit: Techvedic - Computer Tech Support Company | http://www.techvedic.co.uk/ | 0800 016 3909 (UK) | support@techvedic.com
Available link for download
Friday, March 17, 2017
Get Windows 7 Volume Control Box in Windows XP
Get Windows 7 Volume Control Box in Windows XP
Get Windows 7 Volume Control Box in Windows XP, Here is how
1. Type regedit in RUN or Start Menu search box and press Enter. Itll open Registry Editor.
2. Now go to following key:
HKEY_LOCAL_MACHINESOFTWAREMicrosoftWindowsCurrentVersionAuthenticationLogonUIBackground
3. Now in right-side pane, change value of OEMBackground to 1

4. Now go to following folder:
%windir%System32oobe
Here %windir% represents "Windows" folder present in the system drive where Windows 7 is installed.
5. Create a new folder "info" inside oobe folder. Then again create a new folder "backgrounds" inside info folder. So the final path would be:
%windir%System32oobeinfo ackgrounds
6. Now copy any desired wallpaper to this new "backgrounds" folder but following conditions must be followed:
The image name must be backgroundDefault
The image format must be JPG
The image size must be less than 256 KB

Thats it. copy the wallpaper to "backgrounds" folder, your Windows 7 login screen will start using this new wallpaper as background
-----------------------------------------------------------------------------------------------------------------
Techvedic brings proven and reliable cloud backup services at your disposal. Now, stay in touch with your data anywhere, anytime over the Internet using PC, Mac, iPhone & Android devices. We offer cloud backup and recovery plans for home and business users both.
About Techvedic : http://en.wikipedia.org/wiki/Techvedic
Get in touch with Techvedic on Social Media:
Techvedic Facebook Page: https://www.facebook.com/techvedic
Techvedic Twitter: https://twitter.com/techvedic
Techvedic Google Plus Page: https://plus.google.com/+TechvedicInc/posts
Techvedic Youtube: https://www.youtube.com/user/Techvedic
Techvedic Linkidin Profile: https://www.linkedin.com/company/techvedic
Visit: Techvedic - Computer Tech Support Company | http://www.techvedic.co.uk/ | 0800 016 3909 (UK) | support@techvedic.com
-----------------------------------------------------------------------------------------------------------------
Techvedic brings proven and reliable cloud backup services at your disposal. Now, stay in touch with your data anywhere, anytime over the Internet using PC, Mac, iPhone & Android devices. We offer cloud backup and recovery plans for home and business users both.
About Techvedic : http://en.wikipedia.org/wiki/Techvedic
Get in touch with Techvedic on Social Media:
Techvedic Facebook Page: https://www.facebook.com/techvedic
Techvedic Twitter: https://twitter.com/techvedic
Techvedic Google Plus Page: https://plus.google.com/+TechvedicInc/posts
Techvedic Youtube: https://www.youtube.com/user/Techvedic
Techvedic Linkidin Profile: https://www.linkedin.com/company/techvedic
Visit: Techvedic - Computer Tech Support Company | http://www.techvedic.co.uk/ | 0800 016 3909 (UK) | support@techvedic.com
Available link for download
Tuesday, March 14, 2017
Free Calls Anywhere In India Trick
Free Calls Anywhere In India Trick


Limitation Of Trick -
This Trick Is Totally Based On How Much Numbers Exists In Your Mobile Contact List.Example If You Have 20 Mobile Number Saved In Your Contacts Then You Can Call Up-to 40 Minutes With Awesome Voice Clarity.So,Am Tell You The Trick I Cant Wait More For This.
Steps To Follow -
- Give A Miss Call To 180020802080 (Toll Free).
- After Few Seconds You Get A Call From Wheel Company.
- Listen Carefully Instructions And Tell The Number You Want To Call On.
- Then,In Few Seconds You Connected To Your Friend.
I Hope This Article Helps You If You Getting Any Problem Related To This Article You Can Comment By Below Comment Box We Will Help You And If You Need Any Trick Or Software Or Hack You Can Mail Us We Will Try To Give That Article We Happy To Help You All Guys.Thank You Share And Subscribe Us. #Pankaj Patidar Rock
Dont Forget To Like And Follow..
Available link for download
Hide Window When Minimized” Option Back in Windows Live Mail in Windows 7
Hide Window When Minimized” Option Back in Windows Live Mail in Windows 7
To get the "Hide window when minimized" option back in Windows Live Mail:
1. Right-click on the Windows Live Mail shortcut and select Properties. Here the shortcut might be present on Desktop, Programs menu or anywhere else.
2. Go to "Compatibility" tab and enable "Run this program in compatibility mode for:" option.
3. Select "Windows Vista" from the drop-down list and Apply it.

4. Thats it. Now start Windows Live Mail and youll get the option back in its system tray context menu:

-----------------------------------------------------------------------------------------------------------------
1. Right-click on the Windows Live Mail shortcut and select Properties. Here the shortcut might be present on Desktop, Programs menu or anywhere else.
2. Go to "Compatibility" tab and enable "Run this program in compatibility mode for:" option.
3. Select "Windows Vista" from the drop-down list and Apply it.
4. Thats it. Now start Windows Live Mail and youll get the option back in its system tray context menu:
Fix PC, Mac, Tablet, Phone, TV and home theater, gaming console, home automation system and more by calling Techvedic Certified Experts at 0800 016 3909 (Toll Free). Techvedic is a one-stop technology support center for all IT products. No matter where you purchased the product from, we are here to make your technology experience smooth and error-free.
About Techvedic: http://en.wikipedia.org/wiki/Techvedic
Get in touch with Techvedic on Social Media:
Techvedic Facebook Page: https://www.facebook.com/techvedic
Techvedic Twitter: https://twitter.com/techvedic
Techvedic Google Plus Page: https://plus.google.com/+TechvedicInc/posts
Techvedic YouTube:https://www.youtube.com/user/Techvedic
Techvedic LinkedIn Profile:https://www.linkedin.com/company/techvedic
Visit: Techvedic - Computer Tech Support Company | http://www.techvedic.co.uk/ | 0800 016 3909 (UK) | support@techvedic.com
Available link for download
Subscribe to:
Posts (Atom)