Showing posts with label windows. Show all posts
Showing posts with label windows. Show all posts
Monday, July 31, 2017
HOW TO ROLLBACK FROM WINDOWS 10 TECHNICAL PREVIEW TO WINDOWS 8 1 FOR PHONES
HOW TO ROLLBACK FROM WINDOWS 10 TECHNICAL PREVIEW TO WINDOWS 8 1 FOR PHONES
Windows 10 preview
It has been a day since Windows 10 Preview for phone was released for many devices after a wait and youve probably realized that it is far from being finished. While you had fun checking out the Preview, you want to go back to a more stable build. If you want to roll back to Windows Phone 8.1, Microsoft has made it really simple. Youll need a computer, your phone, a USB cable, and the Windows Phone Recovery Tool. make sure that your computer and phone are charged. Are you ready? Continue reading for the next steps.Rollback
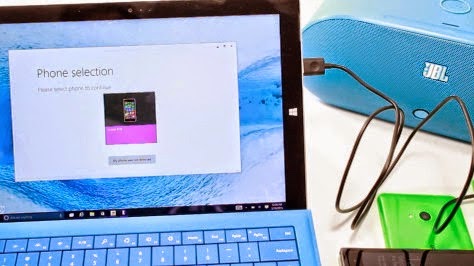
1.Download and install the Windows Phone Recovery Tool to your computer.2.Open the Windows Phone Recovery Tool and connect the phone to your computer with the USB cable. If your phone is not automatically detected, disconnect it from your computer and press My phone was not detected at the bottom and follow the instructions on the screen.
3.If the phone is detected, tap the phone model on the screen to continue.
4.The next screen shows software versions. Tap the reinstall button at the bottom
5.Theres a disclaimer that suggests to backup your phone. Tap continue at the bottom.
6.The recovery tool downloads and installs the firmware. This may take a while depending on your network connection. The installation files are about 1.7 GB. Make sure not to disconnect the cable.
7.If all goes well, you get a message that says, "Operation successfully completed."
Thats it! You should now be back on Windows Phone 8.1. Well let you know if a new build for Windows 10 Preview for phone shows up.
Source - www.Facebook.com//520NL
For more details stay tuned -- http://facebook.com/lumians.world
Thanks for visiting us :-)
Available link for download

Sunday, July 30, 2017
How to Get the Old Thin Taskbar Buttons with Text in Windows 7
How to Get the Old Thin Taskbar Buttons with Text in Windows 7
Here are the steps
1. Right-click on Taskbar and select Properties.
2. Now enable "Use small icons" option.
3. Youll also see that "Taskbar buttons" option would be set to "Always combine, hide labels". Change it to either "Combine when taskbar is full" or "Never combine".
"Combine when taskbar is full" option will group same program buttons in taskbar like Windows XP and Vista. "Never combine" option will disable grouping.
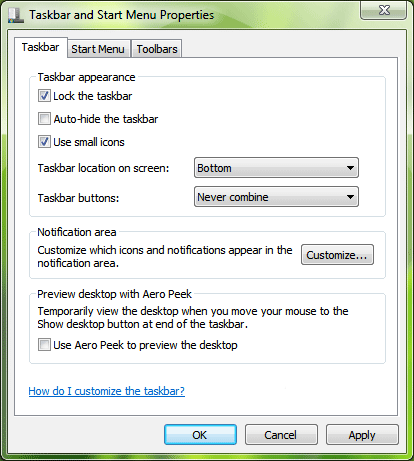
4. Thats it. Apply the changes and you can enjoy the same old thin taskbar with program text in Windows 7.
-----------------------------------------------------------------------------------------------------------------
1. Right-click on Taskbar and select Properties.
2. Now enable "Use small icons" option.
3. Youll also see that "Taskbar buttons" option would be set to "Always combine, hide labels". Change it to either "Combine when taskbar is full" or "Never combine".
"Combine when taskbar is full" option will group same program buttons in taskbar like Windows XP and Vista. "Never combine" option will disable grouping.
4. Thats it. Apply the changes and you can enjoy the same old thin taskbar with program text in Windows 7.
-----------------------------------------------------------------------------------------------------------------
From online computer repair to setup and installation to security and optimization – get everything at one place. Welcome to Techvedic. We are here to make technology work for you the way you want. Get in touch with our experienced professionals over the phone: 0800 016 3909 (Toll Free). Remember, we are not constrained by the brand make or model or even the warranty status. Cheers!
About Techvedic: http://en.wikipedia.org/wiki/Techvedic
Get in touch with Techvedic on Social Media:
Techvedic Facebook Page: https://www.facebook.com/techvedic
Techvedic Twitter : https://twitter.com/techvedic
Techvedic Google Plus Page: https://plus.google.com/+TechvedicInc/posts
Techvedic Youtube:https://www.youtube.com/user/Techvedic
Techvedic Linkidin Profile: https://www.linkedin.com/company/techvedic
Visit: Techvedic - Computer Tech Support Company | http://www.techvedic.co.uk/ | 0800 016 3909 (UK) | support@techvedic.com
Available link for download
Saturday, July 29, 2017
How to Add Aero ON OFF Shortcuts in Desktop and My Computer Context Menu in Windows Vista and 7
How to Add Aero ON OFF Shortcuts in Desktop and My Computer Context Menu in Windows Vista and 7
In Windows Vista and Windows 7, whenever you want to turn Aero process ON or OFF to enable or disable Aero glass effect, you have to do it either from Desktop Properties or from System properties. But did you know there is a very easy shortcut to do it within seconds?
Here are 2 commands to turn Aero ON / OFF which are used by Windows Vista and 7:
Command to Turn Aero ON: Rundll32 dwmApi #102
Alternative command to Turn Aero ON: sc start uxsms
Command to Turn Aero OFF: Rundll32 dwmApi #104
Alternative command to Turn Aero OFF: sc stop uxsms
You can give the commands in RUN dialog box or Start Menu Searchbox. You can also create their shortcuts on Desktop or Quick Launch or wherever you want. It can become quite handy in lots of situations like a software has disabled Aero because it was not compatible with Aero or if you are running out of battery in your laptop, etc.
You can also add these commands in Desktop context menu or My Computer context menu. e.g. when youll right-click on Desktop or My Computer icon, youll find the shortcuts of "Aero ON" and "Aero OFF" there.
Following is a step-by-step tutorial to Add "Aero ON" and "Aero OFF" options in Desktop and My Computer Context Menu:
Add "Aero ON" and "Aero OFF" in Desktop Context Menu:

1. Type regedit in RUN dialog box and press Enter. Now go to:
HKEY_CLASSES_ROOTDirectoryBackgroundshell
2. Right-click on the "Shell" key and select "New -> Key".
3. Give it name Aero ON.
4. Now create another key under "Aero ON" with the name "command" and in right-side pane set value of "Default" to:
Rundll32 dwmApi #102
If the above command doesnt work for you, you can use following command as value:
sc start uxsms
5. Now repeat steps 2-4 to add "Aero OFF" option, i.e. Right-click on the "Shell" key and select"New -> Key".
6. Give it name Aero OFF.
7. Now create another key under "Aero OFF" with the name "command" and in right-side pane set value of "Default" to:
Rundll32 dwmApi #104
If the above command doesnt work for you, you can use following command as value:
sc stop uxsms
8. Thats it. Now youll get both "Aero ON" and "Aero OFF" options in Desktop Context Menu.
Add "Aero ON" and "Aero OFF" in My Computer Context Menu:

1. Type regedit in RUN dialog box and press Enter. Now go to:
HKEY_CLASSES_ROOTCLSID{20D04FE0-3AEA-1069-A2D8-08002B30309D}shell
2. Right-click on the "Shell" key and select "New -> Key".
3. Give it name Aero ON.
4. Now create another key under "Aero ON" with the name "command" and in right-side pane set value of "Default" to:
Rundll32 dwmApi #102
If the above command doesnt work for you, you can use following command as value:
sc start uxsms
5. Now repeat steps 2-4 to add "Aero OFF" option, i.e. Right-click on the "Shell" key and select"New -> Key".
6. Give it name Aero OFF.
7. Now create another key under "Aero OFF" with the name "command" and in right-side pane set value of "Default" to:
Rundll32 dwmApi #104
If the above command doesnt work for you, you can use following command as value:
sc stop uxsms
8. Thats it. Now youll get both "Aero ON" and "Aero OFF" options in My Computer Context Menu.
NOTE: There is also another similar command "Rundll32 dwmApi #105" which is used to run "Flip 3D". You can also add it in My Computer or desktop Context Menu by following the above mentioned steps.
------------------------------------------------------------------------------------
Your business needs pertaining to cloud backup service, tech support and CRM will be satiated in the best way at Techvedic. Just a click and we are at your doorstep.
About Techvedic: http://en.wikipedia.org/wiki/Techvedic
Get in touch with Techvedic on Social Media:
Techvedic Facebook Page: https://www.facebook.com/techvedic
Techvedic Twitter:https://twitter.com/techvedic
Techvedic Google Plus Page: https://plus.google.com/+TechvedicInc/posts
Techvedic YouTube:https://www.youtube.com/user/Techvedic
Techvedic LinkedIn Profile: https://www.linkedin.com/company/techvedic
Visit:Techvedic – Ecommerce Solutions | http://www.techvedic.co.uk/ | 0800 016 3909 (UK) | support@techvedic.com
Available link for download
Wednesday, March 29, 2017
How To Upload Videos To YouTube From Windows Phone
How To Upload Videos To YouTube From Windows Phone
Wanted to upload videos to YouTube from your Windows Phone or Nokia Lumia device ? The latest Windows Phone 8.1 update has just made it possible. Now you can upload videos to YouTube directly from your phone, there by eliminating the need of a PC. Lets Begin With
Note : If the Video is stored outside of Camera Roll or Pictures folder.
If the video that you want to upload is not in the Camera Roll or the Pictures folder, you can use the File Manager to browse to the video. Long tap on the Video and choose Share> Upload to YouTube.

Upload Videos Using Upload To YouTube App
Upload to YouTube is a great (and the only) app in the Windows Phone Store which can upload videos to YouTube directly. Besides uploading to YouTube, it’s another great capability is that it can upload videos in the background and you are not needed to keep app running in the foreground all the time.- Install Upload to YouTube from the Windows Phone Store(LINK).
- Open it and tap on the Pick Video icon.

- Browse through your albums and pick the video file that you want to upload.
- Enter a Title and Description for the video. You can also select the category, tags and the visibility of the video.
- When done, tap on the Upload Icon (3rd icon) and provide access to the app.
- The video will start uploading.
- You will receive a notification when the upload finishes.
Note : If the Video is stored outside of Camera Roll or Pictures folder.
If the video that you want to upload is not in the Camera Roll or the Pictures folder, you can use the File Manager to browse to the video. Long tap on the Video and choose Share> Upload to YouTube.
Upload Videos Using Internet Explorer
Internet Explore 11 in Windows Phone 8.1 comes together with the File Picker which let’s you select and upload files. You can make use of the same to upload videos to YouTube.- Login in to your Google Account.
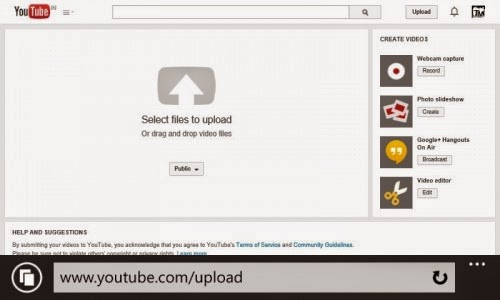
- Open YouTube.com/upload
- Tap on Select files to upload and choose the video file that you want to upload.
- The upload will start.
- Do not browse away from the page or lock the screen else the upload will fail.
Dont Forget To Like And Follow..
Available link for download
Sunday, March 26, 2017
Exclusive Dead Trigger 2 Comes to Windows Phone Store
Exclusive Dead Trigger 2 Comes to Windows Phone Store

As promised last week, developer Madfinger Games has brought its popular free-to-play zombie-themed first person shooter Dead Trigger 2 toWindows Phone owners.

Dead Trigger 2 was first released for Android and iOS devices in October 2013. The game has been updated instantly since then with new content and now has 37 different weapons, 33 environments in 10 different regions and over 600 gameplay
lengthy description from its new Windows Phone page:
TOURNAMENTS FOR REAL PRIZES- Get ready people, here they come. Join warriors from all around the world and fight in the Arena undercustom gladiator rules every week. Become a legend in new Purgatory Arena.
MOUTH-WATERING GRAPHICS -Youll be dazzled by cutting-edge graphics, including real-time water reflections, dynamic vegetation and enhanced ragdolls. Explore multiple locations and slaughter the undead in diverse places like eerie Shanghai alleyways, abandoned mines or the African desert, Europe, South America …
THE FINGERIS MIGHTIER THAN THE GUN - Choose between a touch control scheme created especially for casual players or an enhanced virtual joystick. Do you prefer console gaming? Then go ahead, DeadTrigger 2 supports MOGA.
REAL TIME STORY DEVELOPMENT - You are not alone. Take part in the Global Resistance, tune in to the to stay informed asthe global gameplay develops, directly influenced by the participation of every single player. Enjoy different types of operations such as story or global missions and side-quests.
REWARDS FOR EVERYONE -Participate in global missions and receive rewards. Complete achievements, meet challenges and receive exclusive in-game currency.
THE HIDEOUT - Explore yourpersonal hide-out and meet the Gunsmith, Medic, Scientist, Smuggler and Engineer. These NPCs will help you unlock incredible new weapons and gadgets.
ORIGINAL AND FUN GAMEPLAY - Forget easy-to-kill Zombies. Get ready for Kamikaze, Vomitron and other bosses – powerful Zombies with an inventive approach toyour elimination. Also be sureto try out non-traditional melee weapons such as the Big Hammer, Boat Motor or Machete.
favorite? You gotta try the Grenade Chickens, Rocket Chickens and special Machine-Gun Mounted Chickens. Youre gonna love them…
Grab the game and Unfortunately, you will need a device with 1 GB of RAM and remember, the game download itself is a massive 545 MB!
Download from Here >> Dead Trigger 2.


Stay Connected To Us,
Like Our Facebook Page,
Join Our Facebook Group.
Also follow us on Twitter.
Like Our Facebook Page,
Join Our Facebook Group.
Also follow us on Twitter.
Available link for download
Thursday, March 23, 2017
Interop Tools 1 7 Beta released for Windows 10 Mobile
Interop Tools 1 7 Beta released for Windows 10 Mobile


Interop Tools 1.7 Beta released for Windows 10 Mobile Interop tools is still the provisional name of the tool with the Registry Editor, Application Manager, Tweaks etc for Windows 10 Mobile. Since the idea here with us in May , much has happened. Thus, from the three built-in tools now up 6 become. The app …
Source: WindowsPhoneHub - Free Windows Phone & Windows 10 Mobile Apps & Games
Read Full post here Interop Tools 1.7 Beta released for Windows 10 Mobile or Visit WindowsPhoneHub - Free Windows Phone & Windows 10 Mobile Apps & Games.


Available link for download
Wednesday, March 22, 2017
Face Lock App For Windows Phone
Face Lock App For Windows Phone
Face Lock

This app is based on genuine algorithms of face detection and is 100% working.
This Is just a prank app! and only meant for fun purpose!
Screenshots:


Download From HERE
Available link for download
Sunday, March 19, 2017
Get “Hide Window When Minimized” Option Back in Windows Live Mail in Windows 7
Get “Hide Window When Minimized” Option Back in Windows Live Mail in Windows 7
When I installed Windows Live Mail in Windows 7, I found that "Hide window when minimized" option was missing in Windows Live Mail system tray context menu.
Its one of the most essential option. It allows you to minimize the Windows Live Mail window to system tray instead of taskbar. But its not shown in Windows 7 because of some compatibility issues.
Here is a step-by-step tutorial to get the "Hide window when minimized" option back in Windows Live Mail:
1. Right-click on the Windows Live Mail shortcut and select Properties. Here the shortcut might be present on Desktop, Programs menu or anywhere else.
2. Go to "Compatibility" tab and enable "Run this program in compatibility mode for:" option.
3. Select "Windows Vista" from the drop-down list and Apply it.
.jpg)
4. Thats it. Now start Windows Live Mail and youll get the option back in its system tray context menu:
.png)
Its one of the most essential option. It allows you to minimize the Windows Live Mail window to system tray instead of taskbar. But its not shown in Windows 7 because of some compatibility issues.
Here is a step-by-step tutorial to get the "Hide window when minimized" option back in Windows Live Mail:
1. Right-click on the Windows Live Mail shortcut and select Properties. Here the shortcut might be present on Desktop, Programs menu or anywhere else.
2. Go to "Compatibility" tab and enable "Run this program in compatibility mode for:" option.
3. Select "Windows Vista" from the drop-down list and Apply it.
----------------------------------------------------------------------------------------------------------------
Techvedic is worldwide recognized as an online tech support company that offers best technical support services for a range of third-party computer devices, including PC, phone, Mac, gaming console, tablet, network server, home theater etc. and on premise and cloud-storage applications meant for business and home users. Techvedic’s technical support are accessible as: on-site, online and at repair labs.
About Techvedic : http://en.wikipedia.org/wiki/Techvedic
Get in touch with Techvedic on Social Media:
Techvedic Facebook Page: https://www.facebook.com/techvedic
Techvedic Twitter :https://twitter.com/techvedic
Techvedic Google Plus Page: https://plus.google.com/+TechvedicInc/posts
Techvedic Youtube:https://www.youtube.com/user/Techvedic
Techvedic Linkidin Profile: https://www.linkedin.com/company/techvedic
Visit: Techvedic - Computer Tech Support Company | http://www.techvedic.co.uk/ | 0800 016 3909 (UK) | support@techvedic.com
Available link for download
Friday, March 17, 2017
Get Windows 7 Volume Control Box in Windows XP
Get Windows 7 Volume Control Box in Windows XP
Get Windows 7 Volume Control Box in Windows XP, Here is how
1. Type regedit in RUN or Start Menu search box and press Enter. Itll open Registry Editor.
2. Now go to following key:
HKEY_LOCAL_MACHINESOFTWAREMicrosoftWindowsCurrentVersionAuthenticationLogonUIBackground
3. Now in right-side pane, change value of OEMBackground to 1

4. Now go to following folder:
%windir%System32oobe
Here %windir% represents "Windows" folder present in the system drive where Windows 7 is installed.
5. Create a new folder "info" inside oobe folder. Then again create a new folder "backgrounds" inside info folder. So the final path would be:
%windir%System32oobeinfo ackgrounds
6. Now copy any desired wallpaper to this new "backgrounds" folder but following conditions must be followed:
The image name must be backgroundDefault
The image format must be JPG
The image size must be less than 256 KB

Thats it. copy the wallpaper to "backgrounds" folder, your Windows 7 login screen will start using this new wallpaper as background
-----------------------------------------------------------------------------------------------------------------
Techvedic brings proven and reliable cloud backup services at your disposal. Now, stay in touch with your data anywhere, anytime over the Internet using PC, Mac, iPhone & Android devices. We offer cloud backup and recovery plans for home and business users both.
About Techvedic : http://en.wikipedia.org/wiki/Techvedic
Get in touch with Techvedic on Social Media:
Techvedic Facebook Page: https://www.facebook.com/techvedic
Techvedic Twitter: https://twitter.com/techvedic
Techvedic Google Plus Page: https://plus.google.com/+TechvedicInc/posts
Techvedic Youtube: https://www.youtube.com/user/Techvedic
Techvedic Linkidin Profile: https://www.linkedin.com/company/techvedic
Visit: Techvedic - Computer Tech Support Company | http://www.techvedic.co.uk/ | 0800 016 3909 (UK) | support@techvedic.com
-----------------------------------------------------------------------------------------------------------------
Techvedic brings proven and reliable cloud backup services at your disposal. Now, stay in touch with your data anywhere, anytime over the Internet using PC, Mac, iPhone & Android devices. We offer cloud backup and recovery plans for home and business users both.
About Techvedic : http://en.wikipedia.org/wiki/Techvedic
Get in touch with Techvedic on Social Media:
Techvedic Facebook Page: https://www.facebook.com/techvedic
Techvedic Twitter: https://twitter.com/techvedic
Techvedic Google Plus Page: https://plus.google.com/+TechvedicInc/posts
Techvedic Youtube: https://www.youtube.com/user/Techvedic
Techvedic Linkidin Profile: https://www.linkedin.com/company/techvedic
Visit: Techvedic - Computer Tech Support Company | http://www.techvedic.co.uk/ | 0800 016 3909 (UK) | support@techvedic.com
Available link for download
Thursday, March 16, 2017
Fully featured GMail now available on Windows Phone 8 1 Update 1 IE
Fully featured GMail now available on Windows Phone 8 1 Update 1 IE
An official app isnt yet released for Windows Phone for Gmail yet (third party apps like MetroMail do a wonderful job nevertheless), and Google didnt bat an eye towards Windows Phone. It showed its ignorance by giving just the basic Gmail to Windows Phone. But in 8.1 Update 1, IE handles webpages differently. It renders as Chrome or Safari. So, all websites that you now see on Internet Explorer will look like how it would on Google chrome or iOS safari.
So, on the upside, you can now access a full featured Gmail.

But on the downside, some websites that detect the browser and give suggestions now think that you are on Safari or Chrome.
All in all, a better browser support and better webpage rendering on Windows Phone on the Windows Phone 8.1 Update 1.
Available link for download
Tuesday, March 14, 2017
Hide Window When Minimized” Option Back in Windows Live Mail in Windows 7
Hide Window When Minimized” Option Back in Windows Live Mail in Windows 7
To get the "Hide window when minimized" option back in Windows Live Mail:
1. Right-click on the Windows Live Mail shortcut and select Properties. Here the shortcut might be present on Desktop, Programs menu or anywhere else.
2. Go to "Compatibility" tab and enable "Run this program in compatibility mode for:" option.
3. Select "Windows Vista" from the drop-down list and Apply it.

4. Thats it. Now start Windows Live Mail and youll get the option back in its system tray context menu:

-----------------------------------------------------------------------------------------------------------------
1. Right-click on the Windows Live Mail shortcut and select Properties. Here the shortcut might be present on Desktop, Programs menu or anywhere else.
2. Go to "Compatibility" tab and enable "Run this program in compatibility mode for:" option.
3. Select "Windows Vista" from the drop-down list and Apply it.
4. Thats it. Now start Windows Live Mail and youll get the option back in its system tray context menu:
Fix PC, Mac, Tablet, Phone, TV and home theater, gaming console, home automation system and more by calling Techvedic Certified Experts at 0800 016 3909 (Toll Free). Techvedic is a one-stop technology support center for all IT products. No matter where you purchased the product from, we are here to make your technology experience smooth and error-free.
About Techvedic: http://en.wikipedia.org/wiki/Techvedic
Get in touch with Techvedic on Social Media:
Techvedic Facebook Page: https://www.facebook.com/techvedic
Techvedic Twitter: https://twitter.com/techvedic
Techvedic Google Plus Page: https://plus.google.com/+TechvedicInc/posts
Techvedic YouTube:https://www.youtube.com/user/Techvedic
Techvedic LinkedIn Profile:https://www.linkedin.com/company/techvedic
Visit: Techvedic - Computer Tech Support Company | http://www.techvedic.co.uk/ | 0800 016 3909 (UK) | support@techvedic.com
Available link for download
How to Change Registered Owner and Organization Name in Windows
How to Change Registered Owner and Organization Name in Windows
How to Change Registered Owner and Organization Name in Windows?
1. Following is a screenshot of "System Properties" which shows the Registered Owner as " techvedic" and Organization name as techvedic
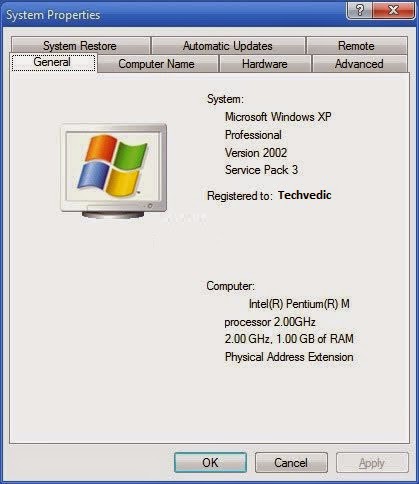
2. To change this information, type regedit in RUN dialog box and press Enter. Itll open Registry editor. Now go to following key:
HKEY_LOCAL_MACHINESOFTWAREMicrosoftWindows NTCurrentVersion
3. In right-side pane, change the value of "RegisteredOwner" and "RegisteredOrganization" to any desired string:
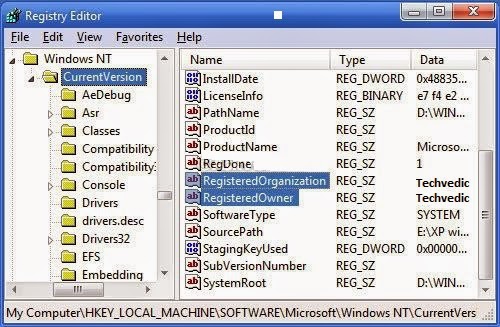
4. Close Registry editor and open System properties again. Now itll show the new Registered Owner and Organization names:
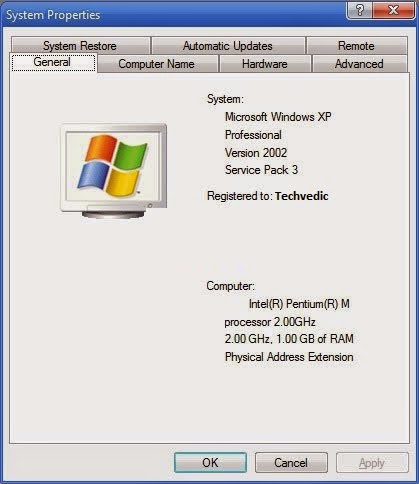
1. Following is a screenshot of "System Properties" which shows the Registered Owner as " techvedic" and Organization name as techvedic
2. To change this information, type regedit in RUN dialog box and press Enter. Itll open Registry editor. Now go to following key:
HKEY_LOCAL_MACHINESOFTWAREMicrosoftWindows NTCurrentVersion
3. In right-side pane, change the value of "RegisteredOwner" and "RegisteredOrganization" to any desired string:
4. Close Registry editor and open System properties again. Now itll show the new Registered Owner and Organization names:
---------------------------------------------------------------------------------------------------------------------
Get out-of-the-box brand-independent technical support for your PC, Mac, Tablet, Phone, TV and home theater, gaming console, home automation system, or any other IT device by calling Techvedic at 0800 016 3909 (Toll Free). We are here to remove evil from technology to let you stay productive, connected and entertained anywhere, anytime.
About Techvedic: http://en.wikipedia.org/wiki/Techvedic
Get in touch with Techvedic on Social Media:
Techvedic Facebook Page: https://www.facebook.com/techvedic
Techvedic Twitter: https://twitter.com/techvedic
Techvedic Google Plus Page: https://plus.google.com/+TechvedicInc/posts
Techvedic YouTube:https://www.youtube.com/user/Techvedic
Techvedic LinkedIn Profile:https://www.linkedin.com/company/techvedic
Visit: Techvedic - Computer Tech Support Company | http://www.techvedic.co.uk/ | 0800 016 3909 (UK) | support@techvedic.com
Available link for download
Sunday, March 12, 2017
FreeCharge UWP Universal App Now available for Windows Devices
FreeCharge UWP Universal App Now available for Windows Devices


FreeCharge UWP Universal App Now available for Windows Devices FreeCharge has been updated & is now a Universal Windows Platform app available for Windows 10 PC’s. The app now supports Cortana and Live tile integration. With the power of Cortana in app you can pay bills and do recharge your phone using your voice. The app now …
Source: WindowsPhoneHub - Free Windows Phone & Windows 10 Mobile Apps & Games
Read Full post here FreeCharge UWP Universal App Now available for Windows Devices or Visit WindowsPhoneHub - Free Windows Phone & Windows 10 Mobile Apps & Games.

Available link for download
Freeware to Move Taskbar and System Tray Buttons in Windows
Freeware to Move Taskbar and System Tray Buttons in Windows
"Taskbar Shuffle" is a utility which you need. Taskbar Shuffle is a simple, small, free utility that lets you drag and drop your Windows Taskbar buttons to rearrange them.

Following are a few interesting features which you get in Taskbar Shuffle:
Full 32-bit and 64-bit support
Reorder your Taskbar buttons by dragging and dropping them
Reorder your tray icons in the same way
Reorder tasks in a grouped buttons popup menu in the same way
Middle-click to close programs on your Taskbar
Works with UltraMon (version 3+ only) Taskbar
Tweak Taskbar button grouping
Above are only a few selected features of Taskbar Shuffle. Just give it a try.
--------------------------------------------------------------------------------
Visit: Techvedic – Ecommerce Solutions | http://www.techvedic.co.uk/ | 0800 016 3909 (UK) | support@techvedic.com
Following are a few interesting features which you get in Taskbar Shuffle:
Full 32-bit and 64-bit support
Reorder your Taskbar buttons by dragging and dropping them
Reorder your tray icons in the same way
Reorder tasks in a grouped buttons popup menu in the same way
Middle-click to close programs on your Taskbar
Works with UltraMon (version 3+ only) Taskbar
Tweak Taskbar button grouping
Above are only a few selected features of Taskbar Shuffle. Just give it a try.
--------------------------------------------------------------------------------
Cloud backup need of yours would be effectively met at Techvedic. For data protection and safety requirements, we are at your service folks.
About Techvedic: http://en.wikipedia.org/wiki/Techvedic
Get in touch with Techvedic on Social Media:
Techvedic Facebook Page: https://www.facebook.com/techvedic
Techvedic Twitter:https://twitter.com/techvedic
Techvedic Google Plus Page: https://plus.google.com/+TechvedicInc/posts
Techvedic YouTube:https://www.youtube.com/user/Techvedic
Techvedic LinkedIn Profile: https://www.linkedin.com/company/techvedic
Available link for download
HTC HIMAã Windows Phoneãƒãƒ¼ã‚¸ãƒ§ãƒ³
HTC HIMAã Windows Phoneãƒãƒ¼ã‚¸ãƒ§ãƒ³

PhoneArena?HTC????????? Upleaks?Twitter?????????????????
???Android??????????Windows Phone???????????
??????HIMA#UL_ATT?HIMA#WL?Windows Phone????????????
?????????????????????????
| ?????? | 1080p 5 ??? |
| ????? | 20.7 MP |
| ????? | 64 bit Snapdragon 810 processor |
| RAM | 3 GB |
| ????? | 2840 mAh |
source:WMPowerUser
Available link for download
Saturday, March 11, 2017
Game Subway Surfer Nantinya Hanya Akan Ada di Windows 10 Mobile
Game Subway Surfer Nantinya Hanya Akan Ada di Windows 10 Mobile

Kabar terbaru datang dari salah satu pengembang game endless running subway surfer. Kiloo yang merupakan pemilik game tersebut memberikan pengumuman mengenai keberadaan game ini di platform windows untuk kedepannya. Jika kamu telah mengunduh game subway surfer ini beruntunglah, mengingat ada berita kurang menyenangkan bagi kamu pengguna windows 8.1. Kiloo yang saat ini memberikan update untuk lokasi terbaru yakni subway surfer, world tour: Prague akan menjadi update terakhir untuk untuk perangkat windows 8.1
Kiloo akan lebih fokus untuk melakukan pengembangan game ini untuk perangkat windows 10 mobile, nantinya update terbaru game ini hanya dapat di unduh oleh perangkat windows 10 mobile sedangkan untuk perangkat windows 8.1 mobile akan tidak di support kembali. Keputusan yang diambil oleh Kiloo ini lebih dimaksudkan untuk biaya efisiensi pengembangan game ini kedepannya yang hanya lebih fokus kepada windows 10 mobile.
Available link for download
Saturday, March 4, 2017
How to efficiently manage Action Centre on Windows 10 Mobile Anniversary Update
How to efficiently manage Action Centre on Windows 10 Mobile Anniversary Update


How to efficiently manage Action Centre on Windows 10 Mobile Anniversary Update Many PC users do not use the Action Centre at all, and at most find it an annoyance. It is however an extremely powerful way to stay on top of what is going on around you. Here is some tips Microsoft put together …
Source: WindowsPhoneHub - Free Windows Phone & Windows 10 Mobile Apps & Games
Read Full post here How to efficiently manage Action Centre on Windows 10 Mobile Anniversary Update or Visit WindowsPhoneHub - Free Windows Phone & Windows 10 Mobile Apps & Games.

Available link for download
First real screenshots of Cortana on Windows Phone
First real screenshots of Cortana on Windows Phone

First real screenshots of Cortana on Windows Phone
Microsoft is set to release Windows Phone 8.1 later this year, which will include Cortana a personal assistant that will rival the likes of Siri and Google Now. The Verge has today published some screenshots, showing how Cortana will look on Windows Phone, replacing the built-in Bing search feature. Theres some bad news for those who were expecting to see the animated character from the Halo universe.

As one can see from the screenshots below, a circular icon will be present, which will animate when calculating or speaking to the Windows Phone owner. Not quite the Halo experience some were praying for, but keeping in line with the simplicity of Windows Phone, its all about the functionality when it comes to virtual asistants.
Cortana Settings
Much like Siri on iOS, Cortana is able to address users by name or nicknames like "Master Chief" from Halo. The assistant will also be able to store information in a notebook system, allowing for quick access to location data, behaviours, personal details, reminders and contact information. Notifications can also be generated through flight tracking and other mentions in email conversations.
In short: Cortana will be more than a mere command and search assistant. Bing will join Foursquare and other services as sources of information, and Cortana will learn and adapt to individuals, offering a more personalised experience. We expect to see more about Cortana in the run up to Build 2014, where Windows Phone 8.1 is likely to be announced.
Available link for download
Subscribe to:
Posts (Atom)