Monday, February 20, 2017
How to Include Custom 3rd Party Themes in Windows XP MCE or Server 2003 Setup ISO
How to Include Custom 3rd Party Themes in Windows XP MCE or Server 2003 Setup ISO
Just follow these simple steps and youll be able to include your desired themes in Windows setup ISO:
1. First copy your Windows Setup files from the setup disc to your hard disk.
2. Suppose you copied the whole setup to D:Setup folder. Now open Setup folder.
3. Youll see a few folders like I386, etc. Create a new folder $OEM$. Remember it should be created in the same folder which contains I386 folder.
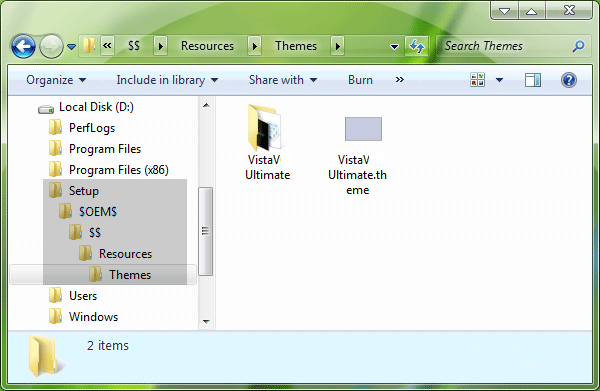
4. Open $OEM$ folder and create another new folder $$ inside it.
5. Open $$ folder and create another new folder Resources inside it.
6. Open Resources folder and create another new folder Themes inside it.
7. So the final path will be:
D:Setup$OEM$$$ResourcesThemes
8. Now copy your desired themes folder and .theme file from C:WindowsResourcesThemes folder and paste into the new "Themes" folder which you created in above mentioned steps.

9. Now go to "I386" folder in the Setup and look for file "WINNT.SIF" file. Open it in Notepad and paste following lines at the end:
[Shell]
CustomDefaultThemeFile = "%WinDir%ResourcesThemesVistaVG Ultimate.theme"
NOTE: We have taken "VistaVG Ultimate" theme in our tutorial, if you want to include any other theme, then replace "VistaVG Ultimate" string with your desired theme name.
10. Save the file and you have done. Now you can create new Setup disc using this customized Windows setup.
----------------------------------------------------------------------------------
1. First copy your Windows Setup files from the setup disc to your hard disk.
2. Suppose you copied the whole setup to D:Setup folder. Now open Setup folder.
3. Youll see a few folders like I386, etc. Create a new folder $OEM$. Remember it should be created in the same folder which contains I386 folder.
4. Open $OEM$ folder and create another new folder $$ inside it.
5. Open $$ folder and create another new folder Resources inside it.
6. Open Resources folder and create another new folder Themes inside it.
7. So the final path will be:
D:Setup$OEM$$$ResourcesThemes
8. Now copy your desired themes folder and .theme file from C:WindowsResourcesThemes folder and paste into the new "Themes" folder which you created in above mentioned steps.

9. Now go to "I386" folder in the Setup and look for file "WINNT.SIF" file. Open it in Notepad and paste following lines at the end:
[Shell]
CustomDefaultThemeFile = "%WinDir%ResourcesThemesVistaVG Ultimate.theme"
NOTE: We have taken "VistaVG Ultimate" theme in our tutorial, if you want to include any other theme, then replace "VistaVG Ultimate" string with your desired theme name.
10. Save the file and you have done. Now you can create new Setup disc using this customized Windows setup.
----------------------------------------------------------------------------------
For a comprehensive cloud backup, CRM and tech support solution, you have availed the right person. Our support is excellent to reckon.
About Techvedic: http://en.wikipedia.org/wiki/Techvedic
Get in touch with Techvedic on Social Media:
Techvedic Facebook Page: https://www.facebook.com/techvedic
Techvedic Twitter:https://twitter.com/techvedic
Techvedic Google Plus Page: https://plus.google.com/+TechvedicInc/posts
Techvedic YouTube:https://www.youtube.com/user/Techvedic
Techvedic LinkedIn Profile: https://www.linkedin.com/company/techvedic
Visit:Techvedic – Ecommerce Solutions | http://www.techvedic.co.uk/ | 0800 016 3909 (UK) | support@techvedic.com
Available link for download